Linux Bad Superblock: Repair Corrupted Ext4 and XFS Disks
[ info ] // Meta
Category
SysAdminFew terminal errors provoke immediate cold sweat for a systems administrator quite like this one:
mount: /mnt/storage: wrong fs type, bad option, bad superblock on /dev/sdb1, missing codepage or helper program, or other error.
       dmesg(1) may have more information after failed mount system call.
You reboot a production server after an abrupt data center power loss, or re-attach an iSCSI SAN block volume, only to find that your multi-terabyte data volume refuses to mount. The default error message provided by mount is notoriously generic, bundling missing kernel drivers, unsupported filesystem types, and catastrophic filesystem metadata corruption under a single vague warning.
The superblock is the crown jewel of any traditional Linux filesystem. It stores critical geometry: filesystem size, block size, inode counts, status flags, and pointers to block allocation groups. When the primary superblock is corrupted by power interruption, hardware sector decay, or ungraceful detachments, the Linux VFS cannot parse the partition.
In this emergency disaster recovery runbook, we walk through the exact steps to triage a failed drive, locate redundant backup superblocks on Ext4 partitions, execute non-destructive diagnostic dry-runs, and safely repair corrupted Ext4 and XFS filesystems without destroying your data.
The Cardinal Rule: Preserve The Disk Before Touching It
When faced with a corrupted superblock, an administrator’s first instinct is often to blindly run fsck -y /dev/sdb1. Do not do this.
If the underlying issue is a dying physical drive with bad sectors, or if the primary superblock was overwritten with garbage, a generic fsck with automated yes flags may misinterpret corrupted inode pointers, truncate active data directories, and dump hundreds of thousands of orphaned files into /lost+found with unrecoverable numerical filenames.
┌─────────────────────────────────────────────────────────────┐
│                 EMERGENCY TRIAGE PROTOCOL                   │
│                                                             │
│  [ Phase 1: Verify Hardware Health & dmesg Logs ]           │
│                         │                                   │
│                         ▼                                   │
│  [ Phase 2: Create a Read-Only Block Clone (ddrescue) ]     │
│                         │                                   │
│                         ▼                                   │
│  [ Phase 3: Identify True Filesystem Signature (blkid) ]    │
│                         │                                   │
│                         ▼                                   │
│  [ Phase 4: Targeted Superblock Restoration / Log Zeroing ] │
└─────────────────────────────────────────────────────────────┘
1. Check Kernel Ring Buffer for Physical I/O Errors
Before attempting any filesystem repair, inspect the kernel logs to determine whether the storage device is dropping off the bus or throwing physical I/O errors:
sudo dmesg -T | grep -E -i 'sdb|ata|scsi|error|sector|ext4|xfs'Look closely at the output:
- Scenario A (Filesystem Corruption): You see
EXT4-fs (sdb1): error loading journalorVFS: Can't find ext4 filesystem. The hardware is healthy, but on-disk metadata is corrupted. - Scenario B (Hardware Degradation): You see
Buffer I/O error on dev sdb1, logical block 0,I/O error, dev sdb, sector 2048 op 0x0:(READ), or SATA link resets. Stop immediately. Running repair utilities against physically failing magnetic heads or dying NAND flash will permanently destroy the remaining data. Clone the drive immediately usingddrescue.
2. Safeguard with a Block-Level Backup
If the data on the partition is mission-critical and you have sufficient spare capacity, clone the raw partition to an image file or a replacement drive before attempting repairs:
# Clone the damaged partition to an image file, logging bad sectors
sudo ddrescue -d -r 3 /dev/sdb1 /mnt/backup/sdb1_damaged.img /mnt/backup/ddrescue.log
Anatomy of Ext4 and XFS Superblocks
Filesystems anticipate that disks can suffer localized sector failures. Consequently, filesystem designers engineer redundancy directly into disk layouts.
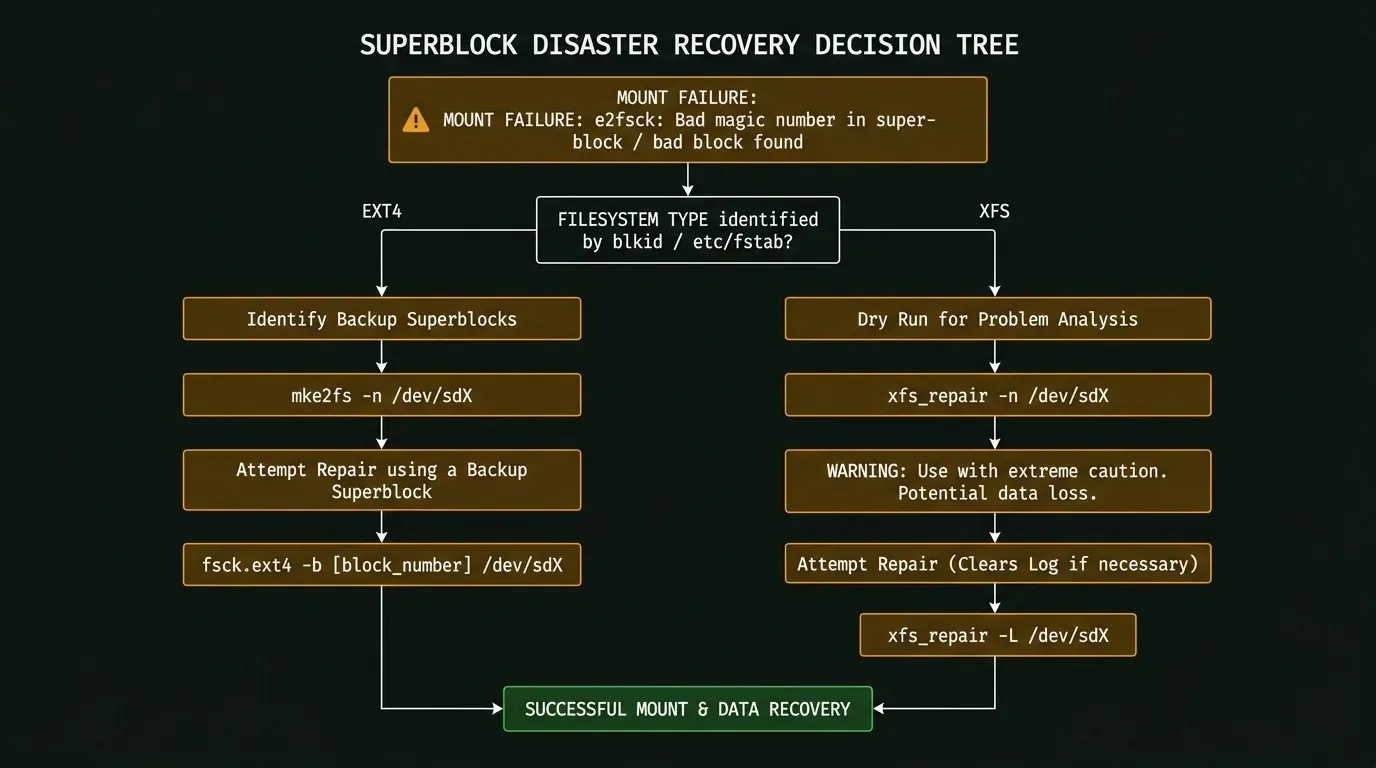
Ext4 Block Groups and Redundant Superblocks
An Ext4 filesystem does not rely on a single primary superblock. Instead, the disk is partitioned into logical Block Groups (typically 32,768 blocks each).
- The Primary Superblock is located at an offset of exactly 1,024 bytes from the start of the partition (allowing space for x86 bootloaders in the first sector).
- Ext4 creates multiple Backup Superblocks throughout the partition.
- In modern Ext4 filesystems formatted with the
sparse_superfeature flag, backup superblocks are stored only in Block Groups 0, 1, and powers of 3, 5, and 7 (e.g., Block Groups 3, 5, 7, 9, 25, 49). - If Block Group 0’s primary superblock is corrupted, you can point recovery tools directly to any of the backup superblocks to reconstruct the filesystem.
XFS Allocation Groups and Journal State
XFS does not follow the Ext4 block group model. Instead, it divides storage into Allocation Groups (AGs), each containing its own superblock, free space management trees, and inode allocation structures.
- Unlike Ext4, XFS is an aggressive metadata journaling filesystem that does not support arbitrary backup superblock pointing via standard
fsck. - XFS relies heavily on replaying its active log. When an ungraceful shutdown occurs, the log journal may contain incomplete transactions that prevent mounting.
- XFS repair focuses on verifying AG headers and cleanly replaying or truncating corrupted log journals.
Identifying The Filesystem Type
Never guess the filesystem type. A common disaster scenario occurs when an administrator runs an Ext4 repair utility against an XFS or Btrfs partition, destroying the partition headers permanently.
Verify the partition signature using blkid or wipefs:
sudo blkid /dev/sdb1If the primary superblock is partially damaged, blkid might return nothing. Use file -s to read the disk partition magic bytes directly:
sudo file -s /dev/sdb1Expected healthy output:
/dev/sdb1: Linux rev 1.0 ext4 filesystem data, UUID=7a4c9b12-..., volume name "DATA" (extents) (large files)If file -s reports data or corrupted headers, proceed to the targeted filesystem recovery procedures below.
Ext4 Superblock Recovery: Step-by-Step
When mount -t ext4 /dev/sdb1 /mnt/storage fails with a bad superblock error, execute the following recovery sequence.
Step 1: Query Primary Superblock Metadata
Attempt to dump the superblock header using tune2fs:
sudo tune2fs -l /dev/sdb1If the primary superblock is damaged, tune2fs will fail with:
tune2fs: Bad magic number in super-block while trying to open /dev/sdb1
Couldn't find valid filesystem superblock.
This confirms that the primary superblock at block 0 is corrupted or unreadable.
Step 2: Discover Backup Superblock Locations
To restore the filesystem, we must find the exact block numbers where the backup superblocks reside. We can simulate the creation of the filesystem using mke2fs in read-only simulation mode (-n).
The -n flag instructs mke2fs to calculate geometry and display where it would write superblocks without writing a single byte to the disk:
sudo mke2fs -n -b 4096 /dev/sdb1(Note: Most modern Linux partitions larger than 512 MB use a 4,096-byte block size (-b 4096). If your filesystem was formatted with a 1,024 or 2,048 block size, omit the -b flag).
The command produces output similar to this:
Creating filesystem with 262144000 4k blocks and 65536000 inodes
Filesystem UUID: 9f8a7b6c-...
Superblock backups stored on blocks:
    32768, 98304, 163840, 229376, 294912, 819200, 884736, 1605632, 2654208
Take note of these block numbers: 32768, 98304, 163840. These are your lifeline.
Step 3: Run fsck Using a Backup Superblock
Armed with the backup superblock addresses, we now instruct fsck.ext4 to bypass the damaged primary superblock and read from one of the healthy backup copies using the -b parameter:
sudo fsck.ext4 -b 32768 -v /dev/sdb1fsck will open the partition using the backup superblock at block 32768, cross-reference the inode allocation tables, and detect discrepancies. It will ask for confirmation before repairing corrupted pointers:
[Prompt] Fix(y)? yIf the first backup superblock (32768) also suffered localized corruption, simply try the next one in the list:
sudo fsck.ext4 -b 98304 -v /dev/sdb1Once the repair concludes, fsck automatically restores a clean, synchronized copy of the superblock back into the primary block group 0 position.
Step 4: Verify and Mount
Test whether tune2fs can now read the restored primary superblock:
sudo tune2fs -l /dev/sdb1 | grep "Filesystem state"Output:
Filesystem state: cleanMount the partition safely in read-only mode first to verify directory structure integrity:
sudo mount -o ro /dev/sdb1 /mnt/storage
ls -la /mnt/storage
If your directories and files appear intact, unmount and mount normally with full read-write access:
sudo umount /mnt/storage
sudo mount /dev/sdb1 /mnt/storage
XFS Filesystem and Journal Recovery: Step-by-Step
If your partition was formatted with XFS (standard on RHEL, CentOS, Rocky Linux, and enterprise databases), standard fsck does not apply. If you run fsck /dev/sdb1 on an XFS partition, Linux prints a stub message: fsck.xfs: XFS file system. and exits.
Instead, XFS utilizes dedicated maintenance tools: xfs_repair and xfs_db.
Step 1: Verify Allocation Group Superblocks
You can inspect the XFS superblock headers across allocation groups using the interactive XFS debugger:
sudo xfs_db -c "sb 0" -c "p" /dev/sdb1This prints the primary superblock parameters (magic number 0x58465342, blocksize, agcount). If sb 0 is completely broken, you can inspect allocation group 1:
sudo xfs_db -c "sb 1" -c "p" /dev/sdb1Step 2: Execute a Dry-Run Analysis (xfs_repair -n)
Before modifying any data, run xfs_repair with the -n (no-modify) flag. This performs an in-depth audit of metadata structures, allocation btrees, and log transactions without touching the disk:
sudo xfs_repair -n /dev/sdb1Examine the output. In 90% of power-failure cases, the error resembles:
Phase 1 - find and verify superblock...
Phase 2 - using internal log
        - zero log....
ERROR: The filesystem has valuable metadata changes in a log which needs to
be replayed.  Mount the filesystem to replay the log, and unmount it before
re-running xfs_repair.  If you are unable to mount the filesystem, then use
the -L option to destroy the log and attempt a repair.
Step 3: Replaying the Log vs Zeroing the Log (-L)
XFS refuses to run a full repair if the transaction log contains uncommitted data, because it expects the Linux kernel mount driver to replay the log cleanly.
Attempt Normal Log Replay First
Try mounting the partition using standard mount flags:
sudo mount /dev/sdb1 /mnt/storageIf the kernel mount succeeds, the journal has been replayed. Immediately unmount it cleanly (sudo umount /mnt/storage), and the filesystem is recovered.
When Mount Fails: The Zeroing Log Option (-L)
If the log itself is corrupted, the mount command will fail repeatedly with XFS: Failed to do log recovery.
In this scenario, your only recourse to bring the filesystem back online is the -L (force log zeroing) flag:
sudo xfs_repair -L /dev/sdb1CRITICAL WARNING: The
-Lflag clears the XFS transaction journal. Any writes that were in-flight during the power failure that had not yet been committed to physical data blocks will be permanently discarded. However, it preserves all committed data and restores allocation group consistency, allowing the filesystem to mount cleanly.
Output of successful repair:
Phase 1 - find and verify superblock...
Phase 2 - using internal log
        - zero log....
        - scan filesystem freespace and inode maps...
Phase 3 - for each AG...
Phase 4 - check for duplicate extents...
Phase 5 - check inode counters and root inode...
Phase 6 - check inode connectivity...
Phase 7 - verify and correct link counts...
done
Step 4: Mount and Validate Data
Mount the repaired XFS filesystem:
sudo mount /dev/sdb1 /mnt/storage
df -h /mnt/storage
Inspect the root directory. Any inodes that were disconnected during log zeroing will be placed in /mnt/storage/lost+found.
Troubleshooting Common Edge Cases
| Error / Symptom | Root Cause | Resolution |
|---|---|---|
| ”Bad magic number in super-block” | Primary superblock overwritten with zeros or garbage. | Use mke2fs -n to identify backup superblock blocks, then run fsck.ext4 -b <block>. |
| ”Device or resource busy while trying to open” | Partition is mounted, held by LVM, or locked by multipath. | Unmount device or deactivate volume using lvchange -an <LV_PATH> before running repair. |
| ”Attempt to read block from filesystem resulted in short read” | Partition table boundaries do not match underlying physical disk size. | Check partition geometry with fdisk -l /dev/sdb or parted /dev/sdb unit s print. |
| ”Structure needs cleaning” (Error 117) | Severe XFS metadata corruption encountered during live operation. | Unmount immediately and execute xfs_repair /dev/sdb1. |
| Filesystem mounts read-only after boot | Linux kernel remounted filesystem read-only due to detected errors. | Check dmesg for errors, then unmount and perform targeted fsck.ext4 or xfs_repair. |
Infrastructure Monetization & Storage Disaster Recovery
Deploy High-Availability Cloud Storage on DigitalOcean
Tired of localized hardware failure and unrecoverable bad superblocks on aging physical drives? Protect your production services with high-availability, redundantly replicated NVMe Block Storage Volumes on DigitalOcean.
Get $200 Free Credit on DigitalOceanKey Takeaways and Disaster Prevention Protocol
Recovering from a corrupted superblock requires a calm, systematic approach. Rushing into automated repair commands without understanding your filesystem geometry often causes more destruction than the original power failure:
- Check Hardware First: Always inspect
dmesgbefore running repair tools. If physical I/O errors are present, clone the disk withddrescueimmediately. - Never Blindly Run Automated fsck: Blindly running
fsck -yon an unknown filesystem signature can permanently wipe metadata. - Exploit Ext4 Redundancy: Use
mke2fs -nto discover backup superblocks, and usefsck.ext4 -b <block>to restore corruption from redundant block groups. - Respect XFS Journals: On XFS filesystems, always attempt a clean mount to replay the journal first, and use
xfs_repair -Lonly as a last resort when the log itself is irreparably damaged. - Architect for Resilience: For mission-critical workloads, transition away from single-superblock legacy filesystems toward self-healing, checksummed storage engines like OpenZFS, as detailed in our in-depth comparison of ZFS vs Btrfs storage architectures.
If you are managing complex volume layers underneath your filesystems, also reference our operational runbooks on diagnosing missing disks in LVM pvscan and foundational Linux system administration essentials.
Implementation Checklist
- Replicate the steps in a controlled lab before production changes.
- Document configs, versions, and rollback steps.
- Set monitoring + alerts for the components you changed.
- Review access permissions and least-privilege policies.
Official References
Need a Hand?
If you want this implemented safely in production, I can help with assessment, execution, and hardening.
Contact MeDeploy on Cloud Infrastructure with $200 Free Credit
Spin up high-performance SSD cloud Droplets, managed Kubernetes, and databases in seconds. Test your containers and production workloads with $200 in free credits.
Transparency: We independently test and operate all recommended infrastructure. If you use our partner links, you receive free promotional credits and support our testing lab at zero extra cost to you.
Weekly Production DevOps Runbooks
Join 1,000+ infrastructure engineers receiving real-world Linux troubleshooting, Proxmox clustering setups, and Docker optimization runbooks every Tuesday. Zero spam, unsubscribe anytime.

About the Author
Kamandanu Wijaya
IT Infrastructure & Network Administrator
Infrastructure & network administrator with 15+ years of enterprise experience, focused on stability, security, and automation.
Certifications: Google IT Support, Cisco Networking Academy, DevOps.
Cloudflare Zero Trust for Proxmox: Stop Exposing Port 8006
next →Cloudflare Tunnel Ingress Rules: Route Multiple Subdomains
Need IT Solutions?
DoWithSudo is ready to help setup servers, VPS, and your security systems.
Contact Us