Cloudflare Zero Trust for Proxmox: Stop Exposing Port 8006

This article is part of the Proxmox High Availability & Security series.
[ info ] // Meta
Category
SecurityIf you log into your router right now, check the port forwarding table, and see TCP port 8006 pointing to your Proxmox server, disable that rule before you read another sentence.
I am not exaggerating. In server virtualization, exposing pveproxy directly to the open internet is the equivalent of leaving your front door unlocked because you were too tired to carry keys to the mailbox.
Most administrators do not do this out of ignorance. They do it out of convenience. You are traveling, a virtual machine locks up, you need emergency console access from an iPad or a hotel network, and opening a temporary port forward takes thirty seconds in your router interface. You tell yourself you will delete the rule on Monday morning.
Then Monday comes, three critical client tickets hit your queue, and you forget.
Three weeks later, Shodan crawlers, Censys bots, and automated brute-force scripts cycling through leaked credential dumps have already fingerprinted your hypervisor. Your host CPU starts burning memory and cycles negotiating TLS handshakes with botnets instead of serving virtual workloads.
tail -f /var/log/auth.log | grep -i "failed"If your port 8006 is forwarded right now, running that command will likely show connection attempts firing multiple times per second from compromised nodes around the world trying dictionary attacks against root.
Leaving that port open is not a calculated risk. It is an unforced error waiting to become a full incident report.
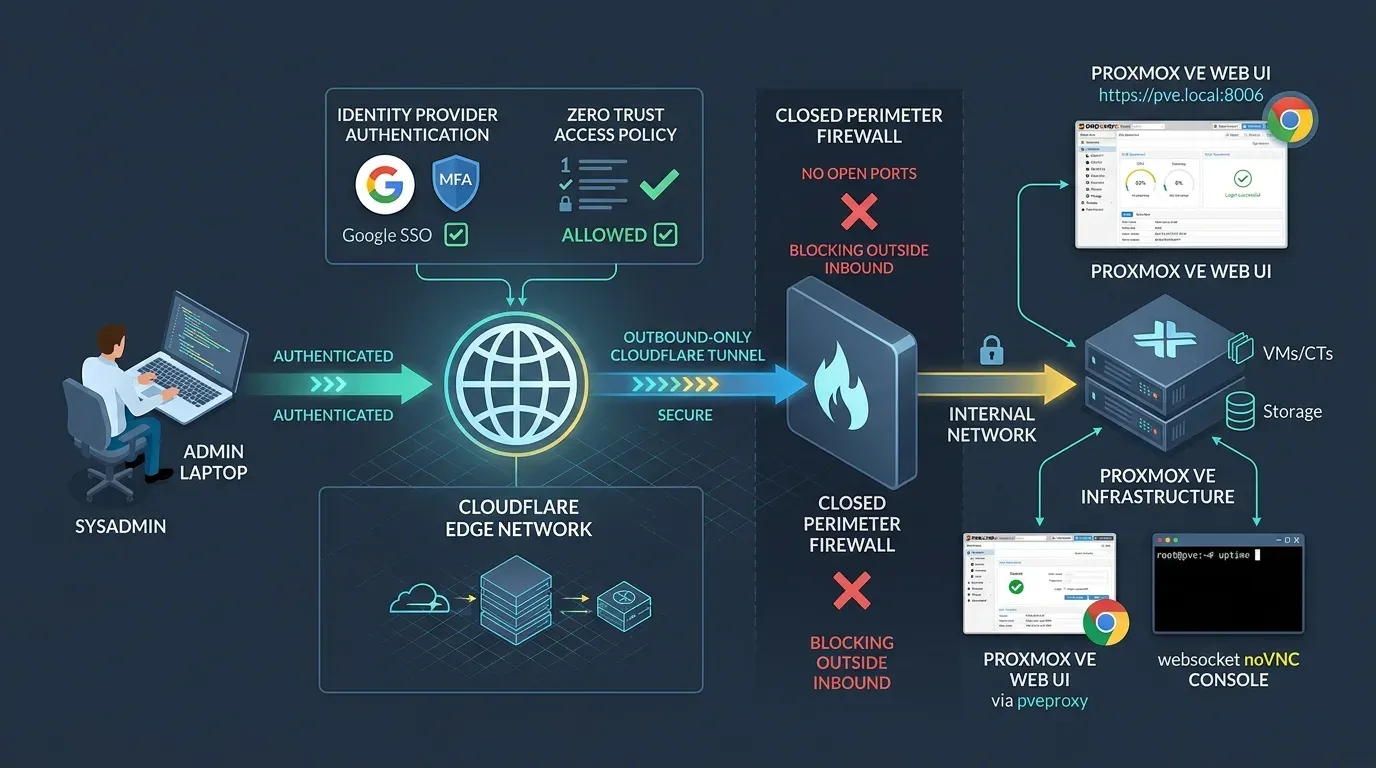
In this guide, we are eliminating that router forward permanently. We will place Proxmox VE behind Cloudflare Zero Trust and an outbound-only cloudflared tunnel. You will gain direct web UI access, responsive noVNC shell consoles, and modern Single Sign-On (Google or GitHub authentication) without opening a single inbound port on your perimeter firewall.
Why exposing port 8006 is a fatal architecture flaw
Before fixing the problem, you must understand why opening raw hypervisor ports is fundamentally different from opening a standard web server port like 80 or 443.
When you expose an Nginx web server running a static blog, an exploit gives the attacker access to an unprivileged www-data account inside an isolated sandbox.
When you expose Proxmox VE port 8006, you are exposing pveproxy.
Traditional Port Forwarding (High Risk):
[ Internet Scanner ] ──(TCP 8006)──► [ Edge Router ] ──► [ Proxmox pveproxy (Port 8006) ]
                                                            │
                                                            ▼ (Vulnerable to Brute-Force,
                                                               DoS, and Web UI CVEs)
pveproxy is the daemon responsible for handling Proxmox web API requests, noVNC console streams, and authentication tickets. While the Proxmox team maintains high code quality, pveproxy runs as root on the physical host. Any zero-day flaw, deserialization bug, or authentication bypass immediately compromises the entire virtualization plane.
We saw this firsthand when dissecting past hypervisor vulnerabilities in our Proxmox security CVEs and patching guide. On top of that, when untrusted traffic reaches your management interface, lateral movement becomes trivial, as documented in our breakdown of hypervisor attacks originating from compromised guest virtual machines.
Here is what happens the minute port 8006 is forwarded on a public IP:
- Continuous Brute Force Scans: Even with
fail2banactive, attackers rotate source IP pools across residential proxy networks. Your CPU wastes cycles processing TLS handshakes and authentication failures instead of serving virtual workloads. - Denial of Service on Management: Flooding
pveproxywith malicious garbage packets can crash the daemon. Ifpveproxystops responding, you lose cluster visibility, a situation detailed in our runbook on troubleshooting Proxmox Web UI port 8006 access failures. - Information Disclosure: The raw Proxmox login banner announces your exact operating system version and cryptographic certificate fingerprints to anyone who asks.
The old-school sysadmin answer was: “Just set up a full site-to-site WireGuard or OpenVPN tunnel.”
VPNs are excellent for dedicated workstations. But when you are on an iPad at an airport, using a client laptop with locked network policies, or handling a rapid incident from a cellular connection, setting up full-tunnel VPN client profiles creates friction.
Zero Trust solves this cleanly. It treats identity, not network topology, as the perimeter.
The Zero Trust architecture: outbound tunnels and edge identity
Instead of letting external packets knock on your router, Cloudflare Zero Trust reverses the connection flow entirely.
You run a lightweight background daemon named cloudflared directly on your Proxmox VE host (or on an adjacent local jump box). When cloudflared starts, it initiates multiple outbound connections to the nearest Cloudflare edge datacenters over encrypted QUIC (UDP 7844) or HTTPS (TCP 443).
Zero Trust Architecture (Outbound Only):
[ Admin Browser ] ──► [ Cloudflare Edge (IdP: Google SSO + MFA) ]
                                 │
                                 ▼ (Outbound-Only Tunnel via Port 7844)
[ Closed Edge Firewall ] ◄───────┴────── [ cloudflared Daemon on PVE Node ]
                                                 │
                                                 ▼ (Local Loopback)
                                         [ pveproxy: 127.0.0.1:8006 ]
Notice what just happened to your security posture:
- Zero Inbound Ports: Your router drops all incoming packets on port 8006. Port scanners see a brick wall.
- Identity Before Connectivity: A user navigating to
pve.yourdomain.comnever reaches your Proxmox server until they authenticate with your Identity Provider (such as Google Workspace, GitHub, or One-Time PIN via email). - DDoS and Exploit Buffering: Web application attacks, malformed HTTP headers, and volumetric floods hit Cloudflare global edge infrastructure, never your local hypervisor hardware.
We previously examined how zero-trust tunnels eliminate edge perimeter risks in our analysis of Cloudflare Tunnel ports and protocol routing.
Now, let us put this architecture into production on Proxmox VE.
Step 1: Installing cloudflared on Proxmox VE
You can install cloudflared directly on your Proxmox Debian host or inside a lightweight dedicated LXC container.
Running cloudflared directly on the PVE host is standard practice for standalone nodes because it has zero dependency on guest storage or virtual networking. It uses negligible system resources (under 30MB of RAM).
Log in to your Proxmox shell as root and download the official Cloudflare Debian repository package:
# Add Cloudflare GPG key
mkdir -p --mode=0755 /usr/share/keyrings
curl -fsSL https://pkg.cloudflare.com/cloudflare-main.gpg | tee /usr/share/keyrings/cloudflare-main.gpg >/dev/null

# Add Cloudflare repository to apt sources
echo 'deb [signed-by=/usr/share/keyrings/cloudflare-main.gpg] https://pkg.cloudflare.com/cloudflared bookworm main' | tee /etc/apt/sources.list.d/cloudflared.list

# Update repository lists and install cloudflared
apt-get update
apt-get install -y cloudflared
Confirm that the binary is operational:
cloudflared --versionYou should see output displaying the current version and build timestamp.
Step 2: Authenticating and creating the named tunnel
Next, link the cloudflared client to your Cloudflare account. Run the login command:
cloudflared tunnel loginThe terminal will print an authentication URL:
Please open the following URL and log in with your Cloudflare account:

https://dash.cloudflare.com/argotunnel?callback=https%3A%2F%2Flogin.cloudflare.com%2F...

Leave cloudflared running to download the cert...
Copy that URL into your workstation browser. Select the domain you wish to use for your hypervisor (e.g., yourdomain.com). Once authorized, Cloudflare automatically downloads a certificate file to /root/.cloudflared/cert.pem.
Now create a permanent named tunnel. We will call ours pve-zero-trust:
cloudflared tunnel create pve-zero-trustOutput:
Tunnel credentials written to /root/.cloudflared/a1b2c3d4-e5f6-7890-abcd-1234567890ab.json.
Created tunnel pve-zero-trust with id a1b2c3d4-e5f6-7890-abcd-1234567890ab
Take note of that generated UUID string (a1b2c3d4-e5f6-7890-abcd-1234567890ab). You will need it for your configuration file and DNS records.
Assign the public hostname for your Proxmox web interface:
cloudflared tunnel route dns pve-zero-trust pve.yourdomain.comThis creates a CNAME record in your Cloudflare DNS table pointing pve.yourdomain.com directly to your tunnel target.
Step 3: Crafting the ingress configuration
This is where ninety percent of administrators run into trouble.
Proxmox VE uses a self-signed TLS certificate by default on port 8006. If you tell cloudflared to route traffic to https://localhost:8006 without specifying TLS behavior, the tunnel daemon will reject the backend connection because the certificate authority is untrusted.
Create the configuration file at /etc/cloudflared/config.yml:
mkdir -p /etc/cloudflared
nano /etc/cloudflared/config.yml
Insert the following production configuration, replacing the UUID and domain with your real values:
tunnel: a1b2c3d4-e5f6-7890-abcd-1234567890ab
credentials-file: /root/.cloudflared/a1b2c3d4-e5f6-7890-abcd-1234567890ab.json

ingress:
  # Primary Proxmox VE Web Management Interface
  - hostname: pve.yourdomain.com
    service: https://localhost:8006
    originRequest:
      noTLSVerify: true
      connectTimeout: 30s
      noHappyEyeballs: false

  # Catch-all rule (Mandatory for cloudflared ingress syntax)
  - service: http_status:404
Why these flags matter
noTLSVerify: true: Instructscloudflaredto establish the encrypted HTTPS connection topveproxywhile ignoring the fact that the default Proxmox certificate is self-signed. Because this communication occurs strictly over the local loopback interface (localhost), your data never leaves physical host memory unencrypted.connectTimeout: 30s: Prevents the tunnel from prematurely aborting long-running API operations (such as uploading large ISO images or migrating VM templates).service: http_status:404: Every Cloudflare ingress file must terminate with a catch-all service rule. Any request arriving on the tunnel that does not match your designated hostname receives a clean 404 response.
Test the configuration file before installing the system daemon:
cloudflared tunnel run pve-zero-trustIf the terminal reports successful QUIC connections to edge datacenters without syntax warnings, press Ctrl+C to stop the interactive run.
Step 4: Enabling the persistent systemd service
You need cloudflared to run continuously in the background and survive hypervisor reboots. Install the native systemd unit:
cloudflared --config /etc/cloudflared/config.yml service installThis command creates /etc/systemd/system/cloudflared.service, moves your configuration to /etc/cloudflared/, and registers the service with systemd.
Start the daemon and enable it on boot:
systemctl daemon-reload
systemctl enable --now cloudflared
systemctl status cloudflared
Verify that the status indicates active (running).
● cloudflared.service - Cloudflare Tunnel
     Loaded: loaded (/etc/systemd/system/cloudflared.service; enabled; preset: enabled)
     Active: active (running) since Mon 2026-09-14 10:30:15 UTC; 12s ago
   Main PID: 14205 (cloudflared)
      Tasks: 14 (limit: 76822)
     Memory: 24.8M
At this stage, navigating to https://pve.yourdomain.com in your browser will open your Proxmox login dashboard.
Stop right here. We are only halfway done.
If you leave the setup as-is, you have merely replaced your router port forward with a Cloudflare domain. Anyone who discovers your domain could still attempt brute-force attacks against your login screen.
Now we lock the front door with Cloudflare Zero Trust Access.
Step 5: Locking the front door with Cloudflare Access
Cloudflare Access places a zero-trust identity proxy in front of your domain. Before an incoming request can even touch your tunnel, the user must prove who they are.
Access Verification Sequence:
[ Request to pve.yourdomain.com ]
               │
               ▼
[ Cloudflare Edge: Is active session cookie present? ]
       ├── YES ──► Pass request down tunnel to pveproxy
       └── NO  ──► Redirect to Identity Provider Login Screen (Google SSO / OTP)
Follow these exact steps in your Cloudflare dashboard:
1. Create a Zero Trust Application
- Open the Cloudflare Zero Trust Dashboard.
- In the left navigation menu, navigate to Access -> Applications.
- Click Add an application and select Self-hosted.
- Configure application parameters:
- Application name:
Proxmox VE Production Console - Session Duration:
24 hours(or8 hoursfor strict enterprise environments) - Application domain: Subdomain
pve, Domainyourdomain.com
- Application name:
2. Configure the Access Policy
Scroll down to the policy configuration section:
- Policy name:
Authorized Hypervisor Administrators - Action:
Allow
Under Configure rules, add an Include condition:
- Selector:
Emails(orEmails ending inif you use a custom Google Workspace domain like@company.com). - Value: Your administrator email address (e.g.,
danu@dowithsudo.com).
Under Additional settings, enable:
- Require Multi-Factor Authentication (MFA): Forces users to verify via an authenticator app or hardware security key (YubiKey).
Click Next through the remaining screens and hit Save application.
Verification
Open an incognito browser window and navigate to https://pve.yourdomain.com.
You will not see the Proxmox login screen. Instead, Cloudflare displays a clean, branded authentication screen demanding an authorized email address. If you enter an unauthorized email, access is blocked at Cloudflare edge datacenters. Your Proxmox host never sees the attempt, logs zero failed packets, and burns zero CPU cycles.
Once you enter your authorized email, complete the One-Time PIN or Google OAuth login, Cloudflare sets a cryptographically signed cookie (CF_Authorization), and the Proxmox login screen appears instantly.
Step 6: The noVNC WebSocket pitfall and how to fix it
Here is the dreaded gotcha that sends sysadmins scrambling back to Reddit at 2:00 AM:
You log in to the Proxmox web UI through Cloudflare Access. Everything looks perfect. You click on a virtual machine, navigate to Console, select noVNC, and you are greeted with a grey screen followed by an abrupt error:
Failed to connect to server (code: 1006)
The WebSocket Breakdown:
[ Browser noVNC ] ──(WSS Connection)──► [ Cloudflare Edge ] ──X (HTTP 1006 Disconnect)
                                                                  │
                                                      (WebSockets Disabled or
                                                       Header Manipulation Conflict)
The noVNC console does not use regular HTTP requests to transmit keystrokes and display video. It upgrades the HTTP connection to a full-duplex WebSocket stream (wss://pve.yourdomain.com/api2/json/nodes/.../vncwebsocket).
When a WebSocket stream fails through Cloudflare Tunnel, it is almost always caused by one of two misconfigurations:
Fix 1: Enable WebSockets in Cloudflare Network Settings
- In the main Cloudflare dashboard (not Zero Trust), navigate to your domain (
yourdomain.com). - Go to Network in the left sidebar.
- Locate WebSockets and ensure the toggle is switched to ON.
Cloudflare enables WebSockets by default for all tiers, but if your zone was provisioned under restrictive organizational templates, it might be disabled.
Fix 2: Origin Request Header Preservation
If WebSockets are enabled in the Cloudflare dashboard but noVNC still drops after five seconds, modify your /etc/cloudflared/config.yml on the Proxmox host.
Add the http2Origin directive under your ingress rule:
tunnel: a1b2c3d4-e5f6-7890-abcd-1234567890ab
credentials-file: /root/.cloudflared/a1b2c3d4-e5f6-7890-abcd-1234567890ab.json

ingress:
  - hostname: pve.yourdomain.com
    service: https://localhost:8006
    originRequest:
      noTLSVerify: true
      connectTimeout: 30s
      http2Origin: false
      keepAliveTimeout: 1m30s
      keepAliveConnections: 100

  - service: http_status:404
Why http2Origin: false matters
pveproxy implements a lightweight, custom HTTP/1.1 daemon for its internal WebSocket proxying. When newer versions of cloudflared attempt to negotiate HTTP/2 to localhost:8006, the handshake can stall during WebSocket upgrade requests, causing the browser to receive exit code 1006. Setting http2Origin: false forces cloudflared to talk classic HTTP/1.1 over the loopback socket, which Proxmox handles with zero friction.
Restart the daemon after making this change:
systemctl restart cloudflaredRefresh your browser, open the noVNC console, and test launching a terminal session inside a running virtual machine. The console will connect instantly and remain stable indefinitely.
Step 7: Final host firewall lockdown
Now that your zero-trust tunnel is fully operational, you must close the loop by hardening the local hypervisor network.
Even though you deleted the port forwarding rule on your perimeter router, what happens if another machine on your local office network or homelab subnet gets compromised?
An attacker who gains a foothold inside your local subnet will immediately scan for port 8006 across the local broadcast domain, the same lateral movement pattern documented in our server pivot attack case study.
We will configure Proxmox VE built-in firewall (pve-firewall) to restrict port 8006 strictly to local loopback and authorized administrative workstations.
1. Enable pve-firewall at the Datacenter level
In the Proxmox Web UI:
- Navigate to Datacenter -> Firewall.
- Under Options, set Enable Firewall to
Yes. - Set Input Policy to
DROP. - Set Output Policy to
ACCEPT.
2. Add node-level rules for local recovery
You must ensure you do not lock yourself out if you need to plug an Ethernet cable directly into the server during an emergency:
# /etc/pve/nodes/<nodename>/host.fw
[OPTIONS]
enable: 1

[RULES]
# Allow local loopback traffic (Required for cloudflared on localhost)
IN ACCEPT -i lo -log nolog

# Allow management access strictly from your dedicated management VLAN or IP
IN ACCEPT -p tcp -dport 8006 -source 192.168.10.50 -log info
IN ACCEPT -p tcp -dport 22 -source 192.168.10.50 -log info

# Allow established connections
IN ACCEPT -m conntrack --ctstate RELATED,ESTABLISHED
Apply the firewall rules:
pve-firewall compile
pve-firewall restart
Now verify the isolation. From any other machine on your standard LAN that is not on your admin allowlist, try probing the port:
curl -k https://192.168.1.100:8006The connection will hang and drop silently. Your Proxmox Web UI is now completely invisible to both public internet scanners and unauthorized internal devices. It is accessible exclusively through your authenticated Cloudflare Zero Trust tunnel.
Comparison: Architecture Trade-Offs
Before committing to any infrastructure architecture, systems engineers must evaluate the trade-offs:
| Parameter | Port Forwarding 8006 | Full WireGuard / Tailscale VPN | Cloudflare Zero Trust Tunnel |
|---|---|---|---|
| Inbound Ports Open | Yes (Port 8006 WAN) | Yes (1 UDP Port for WireGuard) / None (Tailscale DERP) | Zero (Outbound QUIC/HTTPS only) |
| Authentication Barrier | Proxmox login page only | Cryptographic VPN private keys | Edge SSO (Google/GitHub) + MFA + Proxmox Auth |
| Client Configuration | None (Just browse to IP) | VPN software required on every device | None (Standard browser on any device) |
| DDoS / Scanner Shield | Zero protection | High (Packets dropped if unauthenticated) | Complete (Cloudflare global edge buffering) |
| WebSocket / noVNC Stability | Native | Native | Requires http2Origin: false tuning |
| Single Point of Failure | Local ISP / Edge router | Local VPN gateway node | Cloudflare edge availability |
For emergency server triage and mobile administration, Cloudflare Zero Trust provides the highest security-to-convenience ratio available. For heavy storage replication and bulk VM backups, use dedicated point-to-point networks like our Tailscale mesh VPN setup.
Summary Deployment Checklist
Before considering your hypervisor secured, run through this verification checklist:
-
cloudflaredinstalled as an active systemd service on Debian. - Tunnel configuration
/etc/cloudflared/config.ymlverified withoriginRequest: noTLSVerify: true. -
http2Origin: falseconfigured to prevent noVNC exit code 1006 disconnects. - Cloudflare Zero Trust Access application created with strict email allowlist and MFA enforcement.
- Public DNS CNAME record routes traffic through the tunnel without exposing server IP.
- Port forwarding rule for TCP 8006 permanently deleted from the perimeter edge router.
-
pve-firewallactive with default DROP policy on external management ports. - Verified that visiting
https://pve.yourdomain.comrequires edge SSO authentication before the Proxmox login screen appears.
Closing: The peace of mind that comes with zero open ports
There is a distinct psychological difference between managing servers with exposed perimeter ports and managing servers behind zero-trust architecture.
When you forward port 8006, every time you check your server logs, you feel a low-level anxiety. You see the brute-force attempts. You read news about a new hypervisor CVE, and your heart skips a beat because you know your management interface is sitting naked on the internet.
When you route your management interface through an outbound zero-trust tunnel, that entire attack surface evaporates. Internet scanners do not see your server. Malicious payloads never touch pveproxy. And you can access your hypervisor console from a hotel room in Tokyo on an iPad with two-factor authentication, knowing that your homelab or production cluster is completely locked down.
Building secure infrastructure is not about hoping attackers will overlook your IP address. It is about removing their ability to speak to your operating system in the first place.
This article is part of the Proxmox High Availability & Security series.
Implementation Checklist
- Replicate the steps in a controlled lab before production changes.
- Document configs, versions, and rollback steps.
- Set monitoring + alerts for the components you changed.
- Review access permissions and least-privilege policies.
Official References
Need a Hand?
If you want this implemented safely in production, I can help with assessment, execution, and hardening.
Contact MeNeed an Offsite Backup Node or Corosync QDevice?
Deploy an independent cloud Droplet to act as a lightweight Corosync QDevice tiebreaker, remote PBS backup sync relay, or isolated test environment with $200 in free credits.
Transparency: We independently test and operate all recommended infrastructure. If you use our partner links, you receive free promotional credits and support our testing lab at zero extra cost to you.
Weekly Production DevOps Runbooks
Join 1,000+ infrastructure engineers receiving real-world Linux troubleshooting, Proxmox clustering setups, and Docker optimization runbooks every Tuesday. Zero spam, unsubscribe anytime.

About the Author
Kamandanu Wijaya
IT Infrastructure & Network Administrator
Infrastructure & network administrator with 15+ years of enterprise experience, focused on stability, security, and automation.
Certifications: Google IT Support, Cisco Networking Academy, DevOps.
WireGuard vs Tailscale: Performance, Relays, and Overhead
next →Linux Bad Superblock: Repair Corrupted Ext4 and XFS Disks
Need IT Solutions?
DoWithSudo is ready to help setup servers, VPS, and your security systems.
Contact Us