Cloudflare Tunnel Ingress Rules: Route Multiple Subdomains
This article is part of the Zero-Trust Infrastructure Blueprint series.
[ info ] // Meta
Category
NetworkingWhen deploying private services behind an edge proxy, engineers frequently stumble into an operational anti-pattern: spawning an independent cloudflared systemd unit or container for every single subdomain they want to publish. Within a few months, a single Linux node runs six separate tunnel daemons, each establishing four redundant outbound QUIC connections to Cloudflare edge points of presence. System resources get fragmented, log aggregation becomes messy, and monitoring connection health turns into an unnecessary operational headache.
A single cloudflared daemon can route dozens of disparate internal applications, subdomains, and protocols using a centralized ingress table. In this guide, we break down how the Cloudflare Tunnel ingress routing engine evaluates incoming traffic, how to structure a production-grade multi-host configuration file, how to handle self-signed internal TLS without breaking security, and how to route directly to Unix sockets.
The Single-Daemon Architecture vs Tunnel Sprawl
In standard homelab and enterprise edge environments, a server hosts multiple internal services across distinct network sockets. Consider a typical infrastructure host running the following internal services:
- A Gitea code repository on
127.0.0.1:3000 - A REST API backend on
127.0.0.1:8080 - An administrative dashboard bound to a local Unix socket at
/var/run/dashboard.sock - An internal documentation server on
127.0.0.1:4000
If you register each of these services through individual tunnels in the Cloudflare Zero Trust web dashboard, every service creates an isolated tunnel credentials file and its own multiplexed outbound connection pool. If you check network sockets on the host:
ss -tupn | grep cloudflaredYou will see dozens of outbound UDP and TCP connections to ports 7844 and 443 across Cloudflare Anycast IPs. As detailed in our deep dive on Cloudflare Tunnel ports and protocols, multiplexed QUIC tunnels are remarkably efficient, but running redundant daemons on the same kernel wastes socket buffers and multiplies memory overhead.
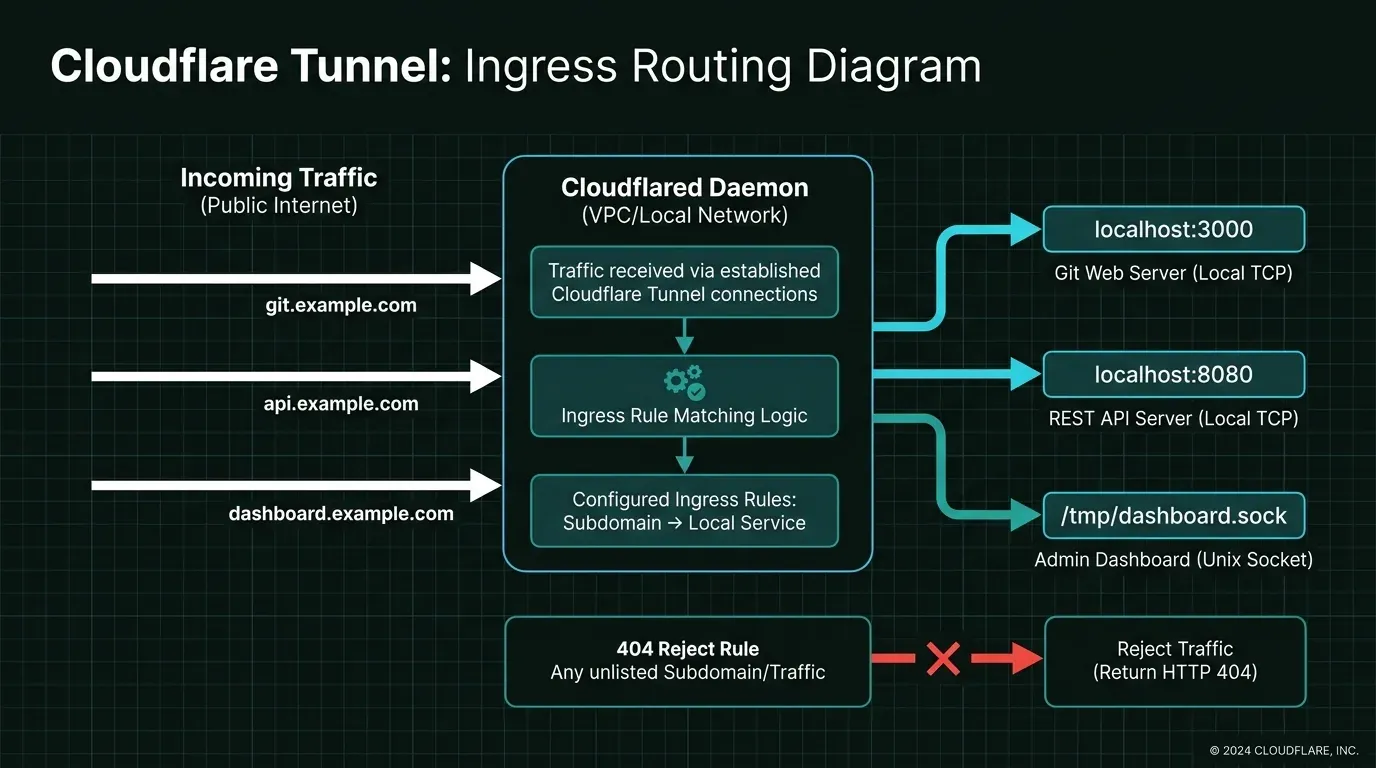
By contrast, using a locally-managed ingress configuration allows one cloudflared process to maintain four persistent edge connections. When an edge server receives an incoming HTTP request for git.example.com, Cloudflare encapsulates the stream over your established tunnel. The local daemon unpacks the packet, matches the hostname against its local ingress rules, and proxies the payload to the correct internal loopback port.
Anatomy of the Ingress Routing Table
The Cloudflare Tunnel ingress table is an ordered array of rules defined under the ingress key in config.yml. The routing engine evaluates incoming requests strictly from top to bottom. The first rule that matches both the requested hostname and optional path handles the traffic.
A complete ingress configuration file contains three core blocks:
- Tunnel Identification: The UUID and path to your tunnel credentials JSON file.
- Global Transport Settings: Optional tunnel-wide timeouts, keep-alive values, and protocol definitions (QUIC vs HTTP/2).
- The Ingress Array: The ordered sequence of host-matching rules, terminating in a mandatory catch-all directive.
Here is a conceptual breakdown of how rule evaluation functions:
tunnel: 3f81e2b4-7c91-4d82-9f33-6a2c7e14d9b0
credentials-file: /etc/cloudflared/3f81e2b4-7c91-4d82-9f33-6a2c7e14d9b0.json

ingress:
  # Rule 1: Specific path matching on a host takes precedence
  - hostname: api.example.com
    path: /v2/metrics
    service: http://127.0.0.1:9090

  # Rule 2: General host matching
  - hostname: api.example.com
    service: http://127.0.0.1:8080

  # Rule 3: Different subdomain pointing to an independent port
  - hostname: git.example.com
    service: http://127.0.0.1:3000

  # Rule 4: Subdomain mapped directly to a Unix domain socket
  - hostname: admin.example.com
    service: unix:/var/run/dashboard.sock

  # Rule 5: Mandatory Catch-All (Returns HTTP 404 for unrouted traffic)
  - service: http_status:404
The Ingress Rule Precedence Trap
Because cloudflared evaluates rules sequentially, placing a broad host match above a specific path match breaks routing for the sub-path. For example:
# INCORRECT: The second rule will NEVER be reached
ingress:
  - hostname: api.example.com
    service: http://127.0.0.1:8080
  - hostname: api.example.com
    path: /v2/metrics
    service: http://127.0.0.1:9090
  - service: http_status:404
Any request to api.example.com/v2/metrics matches the first entry because no path restriction was defined on it. As a result, the request gets forwarded to port 8080 instead of the metrics collector on port 9090. Always declare more specific path patterns above broader hostname definitions.
Step-by-Step Multi-Domain Ingress Configuration
Let us build a complete production configuration from scratch on a Linux server (Debian, Ubuntu, or Rocky Linux).
Step 1: Create the Tunnel and Generate Credentials
If you have not already created a tunnel via the CLI, authenticate your session and create a named tunnel:
cloudflared tunnel login
cloudflared tunnel create prod-edge-cluster
The output will confirm the creation of your tunnel UUID and save a credentials file at ~/.cloudflared/<UUID>.json. Copy this file to /etc/cloudflared/ for systemd access:
sudo mkdir -p /etc/cloudflared
sudo cp ~/.cloudflared/3f81e2b4-7c91-4d82-9f33-6a2c7e14d9b0.json /etc/cloudflared/
sudo chmod 600 /etc/cloudflared/3f81e2b4-7c91-4d82-9f33-6a2c7e14d9b0.json
Step 2: Establish DNS Routing at Cloudflare Edge
Before traffic can flow through the tunnel, your public DNS records must route requests to your tunnel UUID. Run the route dns command for each hostname you plan to serve:
cloudflared tunnel route dns prod-edge-cluster git.example.com
cloudflared tunnel route dns prod-edge-cluster api.example.com
cloudflared tunnel route dns prod-edge-cluster dashboard.example.com
In the Cloudflare dashboard, this creates a CNAME record for each subdomain pointing to <UUID>.cfargotunnel.com with orange-cloud proxying enabled. You never need to point these records to a public IP address, bypassing the need for dynamic DNS or exposed router ports as outlined in our comparison of Cloudflare Tunnel vs port forwarding.
Step 3: Construct the Production config.yml
Create /etc/cloudflared/config.yml with your favorite editor:
sudo nano /etc/cloudflared/config.ymlInsert the following production configuration:
tunnel: 3f81e2b4-7c91-4d82-9f33-6a2c7e14d9b0
credentials-file: /etc/cloudflared/3f81e2b4-7c91-4d82-9f33-6a2c7e14d9b0.json

# Transport configuration
protocol: quic
loglevel: info
transport-loglevel: warn

# Connection tuning
warp-routing:
  enabled: false

ingress:
  # Host 1: Git repository service
  - hostname: git.example.com
    service: http://127.0.0.1:3000
    originRequest:
      connectTimeout: 10s
      noChunkedEncoding: false

  # Host 2: Backend REST API
  - hostname: api.example.com
    service: http://127.0.0.1:8080
    originRequest:
      connectTimeout: 5s
      keepAliveTimeout: 90s
      keepAliveConnections: 100

  # Host 3: Internal Admin Dashboard via Unix Socket
  - hostname: dashboard.example.com
    service: unix:/run/dashboard/admin.sock

  # Host 4: HTTPS Origin with Self-Signed Certificate
  - hostname: vault.example.com
    service: https://127.0.0.1:8200
    originRequest:
      originServerName: vault.internal.lan
      noTLSVerify: true

  # Catch-All Rule (MANDATORY)
  - service: http_status:404
Handling Internal HTTPS Origins and TLS Mismatches
One of the most common stumbling blocks occurs when an internal service is already bound to HTTPS using a self-signed certificate or a local certificate authority (such as HashiCorp Vault, Proxmox VE, or Nextcloud).
If you configure:
- hostname: vault.example.com
  service: https://127.0.0.1:8200
Without additional origin request flags, cloudflared acts as a strict TLS client. It will attempt to validate the internal certificate presented by 127.0.0.1:8200 against the public root CA bundle. When it discovers a self-signed cert or an IP mismatch in the Subject Alternative Name (SAN), it immediately drops the connection and returns an HTTP 502 Bad Gateway error to the client.
Solution 1: Disabling TLS Verification (noTLSVerify)
For internal homelab setups where loopback traffic never traverses an unencrypted physical network, you can bypass local certificate validation:
- hostname: vault.example.com
  service: https://127.0.0.1:8200
  originRequest:
    noTLSVerify: true
Traffic between the browser and Cloudflare edge remains fully encrypted using Cloudflare’s public TLS certificate. The connection between Cloudflare edge and cloudflared is encrypted via the tunnel’s QUIC payload. noTLSVerify only instructs the local daemon to skip validating the self-signed certificate on the final loopback hop.
Solution 2: SNI Override with originServerName
If your backend requires a specific Server Name Indication (SNI) header to route to the correct virtual host:
- hostname: secure.example.com
  service: https://192.168.1.50:443
  originRequest:
    originServerName: internal-node1.corp.local
    caPool: /etc/ssl/certs/internal-ca.crt
This ensures full end-to-end cryptographic verification without modifying the external public hostname.
Routing to Unix Sockets and Custom TCP Services
Running web applications over TCP loopback ports (127.0.0.1:XXXX) introduces unnecessary kernel network stack overhead and exposes internal ports to any unprivileged local user on a shared host.
For maximum performance and security on Linux, configure your origin web servers (such as Nginx, Gunicorn, Puma, or Node.js) to bind directly to a Unix domain socket.
Configuring Unix Socket Ingress
Set up file permissions so the cloudflared system user can read and write to the socket:
sudo chown www-data:cloudflared /run/dashboard/admin.sock
sudo chmod 660 /run/dashboard/admin.sock
In your config.yml:
- hostname: dashboard.example.com
  service: unix:/run/dashboard/admin.sock
cloudflared will stream raw HTTP payloads directly through the Linux VFS buffer cache, completely bypassing the TCP/IP stack, socket allocation tables, and local firewall rules.
Non-HTTP Services: SSH and TCP Arbitrary Streaming
cloudflared ingress rules can also proxy non-HTTP protocols, such as private SSH access, without exposing port 22 to the public internet:
- hostname: ssh.example.com
  service: ssh://127.0.0.1:22
When users connect to ssh.example.com, they use the Cloudflare Access client (cloudflared access ssh --hostname ssh.example.com) or native SSH ProxyCommand integration to establish an authenticated Zero Trust session.
The Mandatory HTTP 404 Catch-All Rule
A frequent question from administrators new to Cloudflare Tunnel is: “Why does cloudflared crash immediately upon startup when I leave out the last rule?”
The cloudflared daemon was deliberately built to require explicit failure handling. If an incoming request passes through the tunnel and does not match any of your specified hostnames or paths, the daemon refuses to make assumptions about how that traffic should be resolved.
# This rule MUST ALWAYS be the last item in the ingress array
- service: http_status:404
If you omit this line, running cloudflared tunnel run will throw the following fatal validation error:
Error: The last ingress rule must match every request (have no hostname or path filters) but has service 'http://127.0.0.1:8080'.By explicitly specifying - service: http_status:404, you guarantee that any stray DNS request or unmapped host returns a clean HTTP 404 Not Found error without exposing internal service routing.
Validating Configuration Before Deployment
Never restart your production cloudflared service without validating your configuration file first. A single syntax error or indentation mistake in config.yml will cause the daemon to fail, dropping all active tunnels.
1. Offline Syntax and Rule Validation
Run the built-in ingress validate command:
cloudflared tunnel ingress validateIf your configuration is syntactically sound and ends with a valid catch-all rule, the CLI will output:
Validating rules from /etc/cloudflared/config.yml
OK: Configuration is valid.
If you have a formatting mistake (such as mismatched indentation or an invalid service URI), the command pinpoints the exact line number:
Validation failed: Ingress rule 2 has invalid service: 'htttp://127.0.0.1:8080' (unsupported protocol)2. Testing Specific URL Routing
You can simulate how an incoming URL will be dispatched through your rules using the ingress rule command:
cloudflared tunnel ingress rule https://git.example.com/loginOutput:
Matched rule 1:
  Hostname: git.example.com
  Service: http://127.0.0.1:3000
Test an unmapped domain to ensure it drops into your catch-all:
cloudflared tunnel ingress rule https://unknown.example.comOutput:
Matched rule 5:
  Service: http_status:404
Production Deployment via Systemd
Once your rules pass validation, configure cloudflared as a managed background service.
1. Install Systemd Service Unit
sudo cloudflared service installThis creates a systemd service file at /etc/systemd/system/cloudflared.service that automatically references /etc/cloudflared/config.yml.
2. Enable and Start the Daemon
sudo systemctl daemon-reload
sudo systemctl enable --now cloudflared
3. Verify Tunnel Health and Edge Connections
Check the live status and connection handshakes:
systemctl status cloudflaredInspect the journal logs to confirm all four edge connections are active:
sudo journalctl -u cloudflared -n 30 --no-pagerYou should see log entries confirming connections to your region’s Anycast edge nodes:
INF Registered tunnel connection connIndex=0 connection=9f1a2b3c-.... location=KUL
INF Registered tunnel connection connIndex=1 connection=8e2d3c4b-.... location=SIN
INF Registered tunnel connection connIndex=2 connection=7d3c4b5a-.... location=KUL
INF Registered tunnel connection connIndex=3 connection=6c4b5a69-.... location=SIN
INF Updated to new configuration config="..."
Hardening with Cloudflare Access Policies
Routing multiple subdomains through a single daemon makes it trivial to apply Zero Trust security perimeters. In a standard setup, protecting administrative interfaces (like Portainer or your Git server) requires configuring complex authentication middleware inside Nginx or Traefik.
With Cloudflare Tunnel, you leave your backend applications completely unaware of the public internet. In the Cloudflare Zero Trust dashboard:
- Navigate to Access > Applications.
- Click Add an Application > Self-Hosted.
- Set the application domain to
dashboard.example.com. - Define your Access Policy (e.g., Require GitHub OAuth or Google Workspace SSO, and restrict access to
@yourcompany.comemail addresses). - Add a second rule requiring a Hardware FIDO2 WebAuthn key.
When an unauthorized user navigates to https://dashboard.example.com, Cloudflare blocks the request at the edge. The traffic never reaches your cloudflared daemon, and zero packets touch your local server. For critical hypervisor nodes, you can combine this with the architecture outlined in our Proxmox Cloudflare Zero Trust hardening guide.
Troubleshooting Common Ingress Errors
| Symptom / Error Code | Root Cause | Resolution |
|---|---|---|
| HTTP 502 Bad Gateway | Internal service is stopped or bound to wrong interface. | Run ss -tulpn on the host to verify the port is actively listening on 127.0.0.1. |
| HTTP 502 (TLS Error in logs) | Origin uses self-signed HTTPS without noTLSVerify. | Add originRequest: { noTLSVerify: true } under the hostname in config.yml. |
| HTTP 404 on Valid Subdomain | Subdomain placed below a broader catch-all or rule syntax mismatch. | Use cloudflared tunnel ingress rule <URL> to trace route matching. |
| cloudflared.service fails to start | Missing catch-all rule or YAML indentation error with tabs. | Run cloudflared tunnel ingress validate to locate syntax issues. |
| Error 1033: Cloudflare Tunnel Error | Tunnel UUID deleted in dashboard or credentials file corrupted. | Verify credentials file path and permissions in /etc/cloudflared/. |
Infrastructure Monetization & Deployment Recommendation
Deploy Cloudflare Tunnels on High-Speed Cloud Infrastructure
Need reliable compute nodes to host your origin microservices and zero trust edge tunnels? Deploy high-performance NVMe cloud droplets on DigitalOcean with predictable pricing.
Get $200 Free Credit on DigitalOceanKey Takeaways and Production Blueprint
Consolidating your edge ingress into a single cloudflared daemon eliminates configuration drift, preserves host socket memory, and simplifies Zero Trust access policies across all your internal applications:
- Rule Evaluation is Top-to-Bottom: Always place specific URLs and paths above generic hostnames.
- The Catch-All is Mandatory: Every ingress table must terminate with
- service: http_status:404. - Prefer Unix Domain Sockets: Wherever possible, bind internal web applications to Unix sockets for superior throughput and reduced kernel overhead.
- Validate Before Reloading: Always run
cloudflared tunnel ingress validatebefore issuingsystemctl restart cloudflared. - Enforce Zero Trust at Edge: Combine ingress rules with Cloudflare Access to protect admin portals before traffic ever reaches your infrastructure.
By adhering to this structure, your edge routing remains fast, auditable, and resilient. For broader server protection principles, combine these tunnel ingress patterns with our Linux server hardening best practices.
This article is part of the Zero-Trust Infrastructure Blueprint series.
Implementation Checklist
- Replicate the steps in a controlled lab before production changes.
- Document configs, versions, and rollback steps.
- Set monitoring + alerts for the components you changed.
- Review access permissions and least-privilege policies.
Official References
Need a Hand?
If you want this implemented safely in production, I can help with assessment, execution, and hardening.
Contact MeDeploy on Cloud Infrastructure with $200 Free Credit
Spin up high-performance SSD cloud Droplets, managed Kubernetes, and databases in seconds. Test your containers and production workloads with $200 in free credits.
Transparency: We independently test and operate all recommended infrastructure. If you use our partner links, you receive free promotional credits and support our testing lab at zero extra cost to you.
Weekly Production DevOps Runbooks
Join 1,000+ infrastructure engineers receiving real-world Linux troubleshooting, Proxmox clustering setups, and Docker optimization runbooks every Tuesday. Zero spam, unsubscribe anytime.

About the Author
Kamandanu Wijaya
IT Infrastructure & Network Administrator
Infrastructure & network administrator with 15+ years of enterprise experience, focused on stability, security, and automation.
Certifications: Google IT Support, Cisco Networking Academy, DevOps.
Linux Bad Superblock: Repair Corrupted Ext4 and XFS Disks
next →Docker Compose in Production: Reverse Proxy and Secrets
Need IT Solutions?
DoWithSudo is ready to help setup servers, VPS, and your security systems.
Contact Us