How to Extend LVM Thin Pool Without Unmounting on Linux Host
At 03:40 on a Sunday, a monitoring page woke me with fourteen alerts in ninety seconds. Four KVM guests on the same host had gone read-only, a GitLab runner had stopped writing job logs, and the host itself was still perfectly responsive. CPU idle, RAM fine, no kernel panic. Every affected filesystem returned Input/output error on write and succeeded on read, which is the fingerprint of a thin pool that cannot allocate a block.
The pool metadata volume had filled to 100 percent. Nobody had extended it in eighteen months, and the threshold alert we set on the data volume never fired because data usage was a comfortable 68 percent. Metadata is a separate allocation, and it grows with the number of blocks the pool tracks, not with the bytes your applications write.
Everything in that incident was recoverable, and no data was lost, but the recovery window cost a client four hours of pipeline time. This article is the online extension runbook I use now, plus the autoextend policy that means a human never has to be awake for it again.
The Two Volumes Inside a Thin Pool
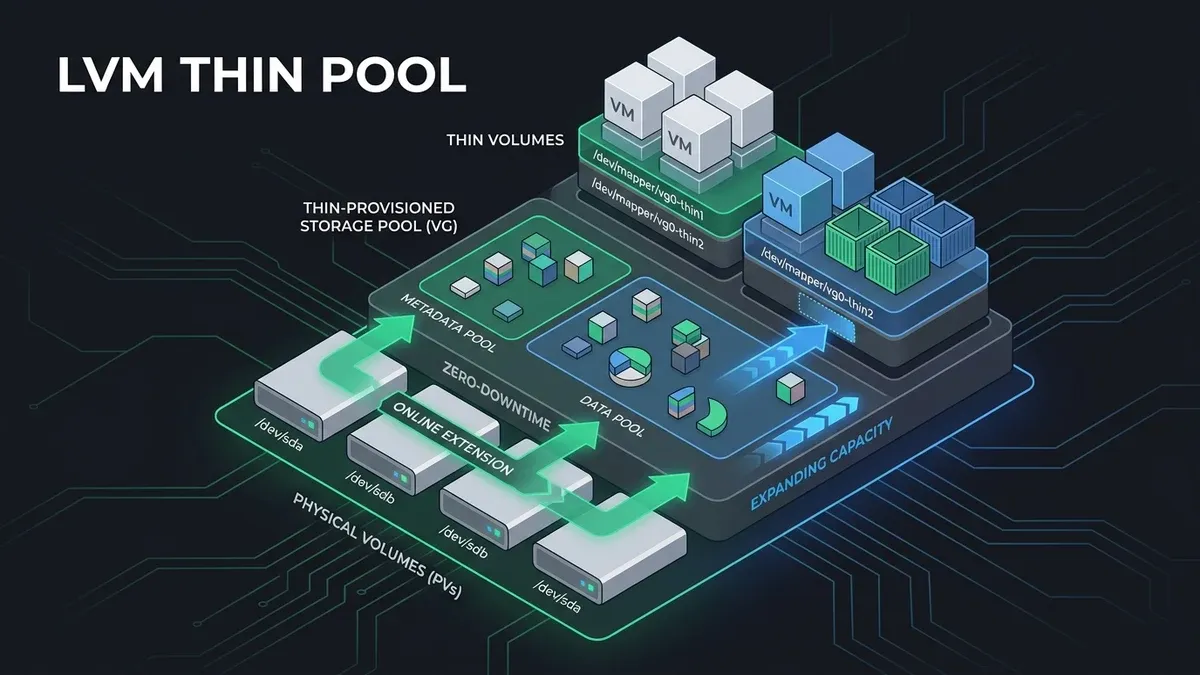
A thin pool is not one device. It is a pair of internal logical volumes that the kernel device mapper driver uses together.
pool_thin_tdataholds the actual data blocks your virtual volumes write. This is the part everyone watches.pool_thin_tmetaholds the allocation map that records which chunk belongs to which thin volume, plus snapshot metadata and transaction state.
By default LVM sizes the metadata volume at roughly 1 GB for every 100 TB of data pool, with a practical floor around 16 MB. That ratio assumes large sequential writes. It goes wrong on workloads with many small writes, heavy snapshot counts, or hundreds of thin volumes, because each tracked chunk and each snapshot lineage consumes entries in the metadata map.
| Failure | Symptom | Blast radius |
|---|---|---|
| Data volume full | Writes block or fail with ENOSPC | One thin volume, or the pool if queued |
| Metadata volume full | Pool flips to read-only, metadata may be inconsistent | Every thin volume on the pool |
| Snapshot overflow | Snapshot invalidated, origin unaffected | The snapshot only |
| VG has no free extents | Autoextend cannot run | Whole pool, silently |
The distinction matters because the remedies are different. A full data volume is an inconvenience. A full metadata volume is an incident, and in the worst case it needs thin_repair against a metadata dump before the pool will activate again.
Reading Pool Health Before It Bites
The default lvs output hides the internal volumes, which is why so many teams miss metadata pressure entirely. Ask for the fields you actually need.
sudo lvs -a -o name,lv_size,data_percent,metadata_percent,thin_count,when_full vg_data LV LSize Data% Meta% #Thin WhenFull
pool_thin 2.00t 68.31 97.42 9 queue
[pool_thin_tdata] 2.00t
[pool_thin_tmeta] 32.00mTwo numbers in that output deserve a policy. Meta% at 97 is one large transaction away from a freeze. #Thin at 9 tells you the pool carries more consumers than you probably remember, and every snapshot counts. WhenFull queue is the LVM default, which means writes pause instead of failing, and a paused write path looks like an application hang rather than a storage error.
The alerting rule I now apply to every thin pool host is blunt. Warn at metadata 70 percent, page at 85 percent, and page at data 90 percent. If you run node_exporter, the relevant metrics come from the LVM collector, and the same check belongs in a cron script for hosts without Prometheus.
#!/usr/bin/env bash
# /usr/local/sbin/check-thin-pool.sh
set -euo pipefail
VG="${1:-vg_data}"
POOL="${2:-pool_thin}"
meta=$(lvs --noheadings --nosuffix -o metadata_percent "${VG}/${POOL}" | tr -d ' ')
data=$(lvs --noheadings --nosuffix -o data_percent "${VG}/${POOL}" | tr -d ' ')
meta_int=${meta%.*}
data_int=${data%.*}
if [ "${meta_int}" -ge 85 ]; then
  echo "CRITICAL: ${VG}/${POOL} metadata at ${meta}%"
  exit 2
fi
if [ "${data_int}" -ge 90 ]; then
  echo "WARNING: ${VG}/${POOL} data at ${data}%"
  exit 1
fi
echo "OK: metadata ${meta}% data ${data}%"
Runbook: Extend the Pool Without Unmounting Anything
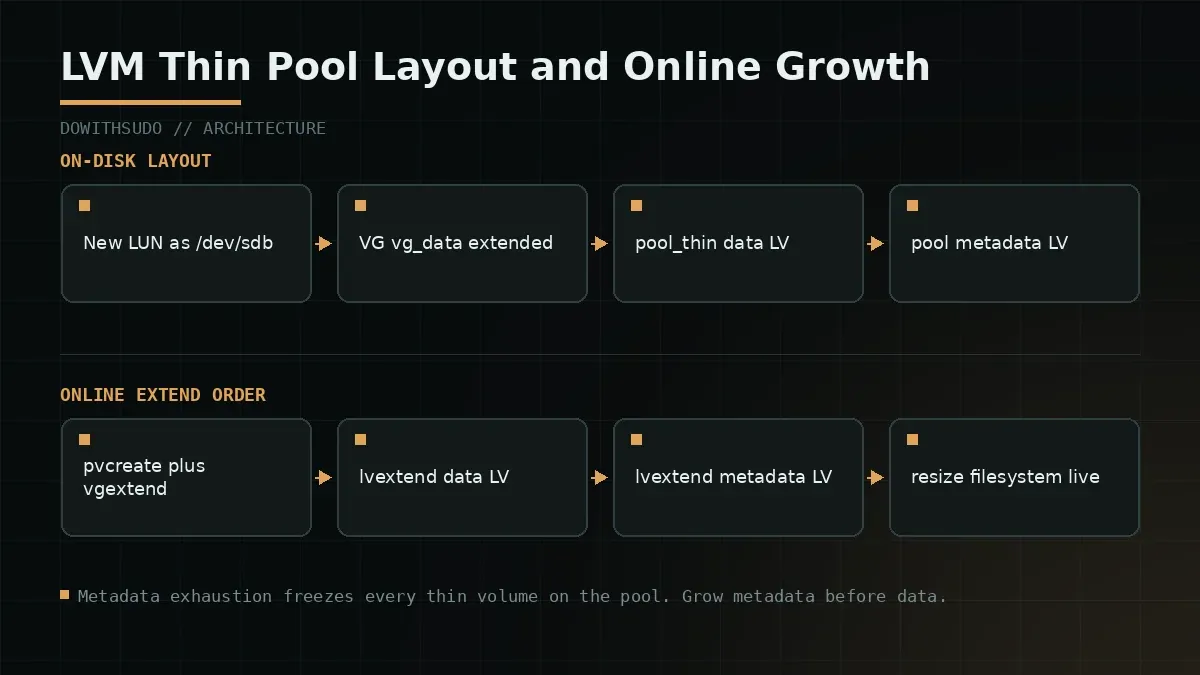
The rule that keeps this operation safe is order. Metadata first, then data. Extending data while metadata is still tight makes the next sixty seconds more dangerous rather than less.
The steps below assume a new disk at /dev/sdb and a pool named vg_data/pool_thin. Confirm the device and the free space before you touch anything.
lsblk -o NAME,SIZE,TYPE,FSTYPE,MOUNTPOINT /dev/sdb
sudo vgs vg_data
sudo pvs
1. Add the physical volume and extend the volume group
sudo pvcreate /dev/sdb
sudo vgextend vg_data /dev/sdb
sudo vgs vg_data
VG #PV #LV #SN Attr VSize VFree
vg_data 3 14 6 wz--n- 4.50t 1.50tVFree is the number that matters for autoextend. If it sits at zero, LVM has nothing to hand out, and every policy setting in lvm.conf becomes decorative.
2. Extend the metadata volume first
sudo lvextend --poolmetadatasize +1G vg_data/pool_thin
sudo lvs -a -o name,lv_size,metadata_percent vg_data
A gigabyte of metadata is a large increase for most pools, since the map entries are small. If your pool tracks millions of chunks with deep snapshot trees, grow it in 1 GB steps and watch Meta% after each one rather than doubling it in a single call.
3. Extend the data volume
sudo lvextend -L +500G vg_data/pool_thin
sudo lvs -a -o name,lv_size,data_percent,metadata_percent vg_data
4. Grow the guest filesystem, still online
The pool now has more room, but each thin volume keeps its old size. Resize the volumes that need space and let LVM grow the filesystem in the same call.
sudo lvextend -r -L +200G /dev/vg_data/appdata
sudo xfs_growfs -n /mnt/appdata
For ext4, -r runs resize2fs for you. For XFS, -r runs xfs_growfs on the mount point, and XFS can only grow, never shrink, so size your increase once and verify with df -h. Guests running on top of thin volumes see the larger disk immediately for most filesystems, while KVM guests with a partitioned image may need a rescan inside the guest.
Autoextend So This Never Pages You at 03:40
LVM ships an automatic extension mechanism driven by dmeventd. It is off by default and most hosts never enable it.
# /etc/lvm/lvm.conf
activation {
    thin_pool_autoextend_threshold = 70
    thin_pool_autoextend_percent = 20
}
sudo systemctl status dm-event.socket
sudo systemctl enable --now dm-event.socketWhat happens with those values is this. When pool usage crosses 70 percent, dmeventd asks LVM for enough free extents to add 20 percent more capacity. If the volume group has free space, the pool grows and no one notices. If it does not, dmeventd logs a failure that lands in journalctl -u dm-event and often nowhere else.
Three caveats I have learned the hard way.
- Autoextend covers the data volume by default. Newer LVM versions also extend metadata when the same threshold triggers, but that behaviour varies by distribution, so keep the 85 percent metadata page.
- Set the threshold low enough that one growth step finishes before the next full threshold is reached. A 95 percent threshold with a 5 percent step means the pool is in a permanent growth race.
- Keep at least one growth step of free space in the VG at all times. On hosts where the VG is fully allocated, autoextend cannot save you, and you will be adding a disk at 04:00 anyway.
Automatic growth removes the human from the loop. It does not remove the need for free capacity.
Recovering a Pool That Already Froze Read-Only
If the metadata volume has already hit 100 percent, the pool typically refuses writes and may refuse activation. Work in this order and do not reboot mid-procedure.
# 1. Confirm the state without stressing the pool.
sudo lvs -a -o name,lv_size,data_percent,metadata_percent,when_full vg_data
sudo dmsetup status | grep thin

# 2. Free space in the VG if there is none.
sudo vgextend vg_data /dev/sdb

# 3. Extend metadata before anything else.
sudo lvextend --poolmetadatasize +1G vg_data/pool_thin

# 4. If the pool is still read-only, trigger a device recheck.
sudo dmsetup message vg_data-pool_thin-tpool 0 "set_metadata_threshold 70"

# 5. Reactivate the thin volumes that were paused.
sudo lvchange -ay vg_data/appdata
sudo lvchange -ay vg_data/gitlab
If step 4 returns an error about an unknown target, the metadata maps may be inconsistent and you are in thin_repair territory. That path needs a metadata backup, a maintenance window, and a verified restore of the affected volumes. It is also avoidable in every case I have personally seen, because the failure always begins with an ignored threshold alert.
For volumes that come back with filesystem errors after a freeze, do not run repair tools while the pool is still unstable. Extend the pool, get writes flowing, then take the affected filesystem offline and follow the superblock repair procedure for ext4 and XFS at corrupted superblock repair. Running fsck against a volume whose block device keeps flipping read-only does more damage than waiting.
Failure Modes Worth Memorising
1. Metadata extended, but the VG had no free extents
Symptom: lvextend returns Insufficient free space: 256 extents needed, but only 0 available, and the pool stays read-only.
sudo vgs vg_data
sudo pvs --segments
Add a device first, then repeat the metadata extension. On cloud instances, this is where resizing the attached volume and running pvresize on the existing physical volume is faster than adding a new one.
sudo pvresize /dev/nvme1n1
sudo vgextend vg_data /dev/nvme1n1
2. dmeventd enabled but the thin plugin never loaded
Symptom: the threshold is crossed repeatedly and nothing happens. journalctl -u dm-event shows no thin pool lines at all.
sudo systemctl status dm-event.socket
ls /usr/lib/udev/rules.d | grep -i dm
sudo journalctl -u dm-event --since "1 hour ago" --no-pager
Some minimal images ship lvm2 without the libdevmapper-event-lvm2thin plugin. Install the full lvm2 package set and restart the socket. Without the plugin, autoextend is only a configuration file that describes what you wish would happen.
3. Snapshot overflow quietly eating the pool
Symptom: data percent climbs in steps that do not match application write volume, and metadata usage rises with it.
sudo lvs -a -o name,origin,lv_size,data_percent,metadata_percent,snap_percent vg_dataLong-lived snapshots of high-churn volumes copy every changed chunk. Keeping a snapshot for sixty days on a database volume can cost more real space than the database itself. Set a snapshot retention policy in months, not quarters, and verify with snap_percent that each snapshot is not approaching its reserved size.
Production Verification Checklist
| Check | Command | Expected |
|---|---|---|
| Pool visible with internals | lvs -a -o name,lv_size,data_percent,metadata_percent vg_data | Data and meta both under thresholds |
| Free extents available | vgs vg_data | VFree at least one growth step |
| Autoextend configured | grep -A3 activation /etc/lvm/lvm.conf | Threshold 70, percent 20 |
| dmeventd running | systemctl is-active dm-event.socket | active |
| Thin plugin present | ls /usr/lib/x86_64-linux-gnu/devmapper/ | libdevmapper-event-lvm2thin.so |
| Alerts wired | check-thin-pool.sh vg_data pool_thin | Exit code reflects usage |
| Snapshots bounded | lvs -o name,snap_percent | No snapshot above 60 percent |
| Recovery rehearsed | maintenance window | Volume starts after pool pause |
The last row is the one that separates a runbook from a document. I now rehearse the freeze on a lab pool once per quarter by filling metadata to the threshold with dd against a scratch thin volume, then walking the recovery steps. It takes twenty minutes and it means the next time it happens in production, the operator is following a procedure they have already executed rather than reading one for the first time.
Closing Thoughts
Thin provisioning makes capacity look infinite right up until the moment the allocation map runs out, and by then the failure has already spread to every guest on the host. Two thresholds, one autoextend policy, and fifteen minutes of maintenance work per quarter keep the whole class of incident off your calendar.
If your LVM problems show up earlier, at the point where a disk is not visible to pvscan at all, that is a different failure with a different recovery path, and it is covered in our troubleshooting walkthrough for a missing physical volume. And if you are deciding between LVM-Thin and other Proxmox storage backends for a new node, the trade-offs against ZFS and Ceph are laid out in Proxmox storage architecture. Pick the backend, then write down the metadata threshold for it somewhere you will see it at 03:40.
Implementation Checklist
- Replicate the steps in a controlled lab before production changes.
- Document configs, versions, and rollback steps.
- Set monitoring + alerts for the components you changed.
- Review access permissions and least-privilege policies.
Official References
Need a Hand?
If you want this implemented safely in production, I can help with assessment, execution, and hardening.
Contact MeDeploy on Cloud Infrastructure with $200 Free Credit
Spin up high-performance SSD cloud Droplets, managed Kubernetes, and databases in seconds. Test your containers and production workloads with $200 in free credits.
Transparency: We independently test and operate all recommended infrastructure. If you use our partner links, you receive free promotional credits and support our testing lab at zero extra cost to you.
Weekly Production DevOps Runbooks
Join 1,000+ infrastructure engineers receiving real-world Linux troubleshooting, Proxmox clustering setups, and Docker optimization runbooks every Tuesday. Zero spam, unsubscribe anytime.

About the Author
Kamandanu Wijaya
IT Infrastructure & Network Administrator
Infrastructure & network administrator with 15+ years of enterprise experience, focused on stability, security, and automation.
Certifications: Google IT Support, Cisco Networking Academy, DevOps.
Automated PostgreSQL Docker Backup to S3 with GPG Encryption
next →Docker Rootless Mode: Setup, Limitations, and Production
Need IT Solutions?
DoWithSudo is ready to help setup servers, VPS, and your security systems.
Contact Us