Proxmox PCIe GPU Passthrough Guide for Local LLM Workloads
[ info ] // Meta
Category
AIA team I worked with spent four months serving a 7B parameter model on rented cloud GPUs. Their monthly bill for an A10G instance and attached storage landed between 1,900 and 2,400 US dollars depending on how much time the dev environment stayed up, and their finance lead asked a fair question during a quarterly review. What does this cost if we buy the hardware instead?
The answer was uncomfortable for cloud pricing. A single workstation class machine with a 24 GB consumer card, 128 GB of RAM, and 4 TB of NVMe paid for itself in under six months at that burn rate, and the machine could also run their staging Kubernetes cluster and a CI runner. What they did not have was a plan for virtualising the GPU, because their Proxmox host could not see it after install and every tutorial they found assumed a clean single purpose server.
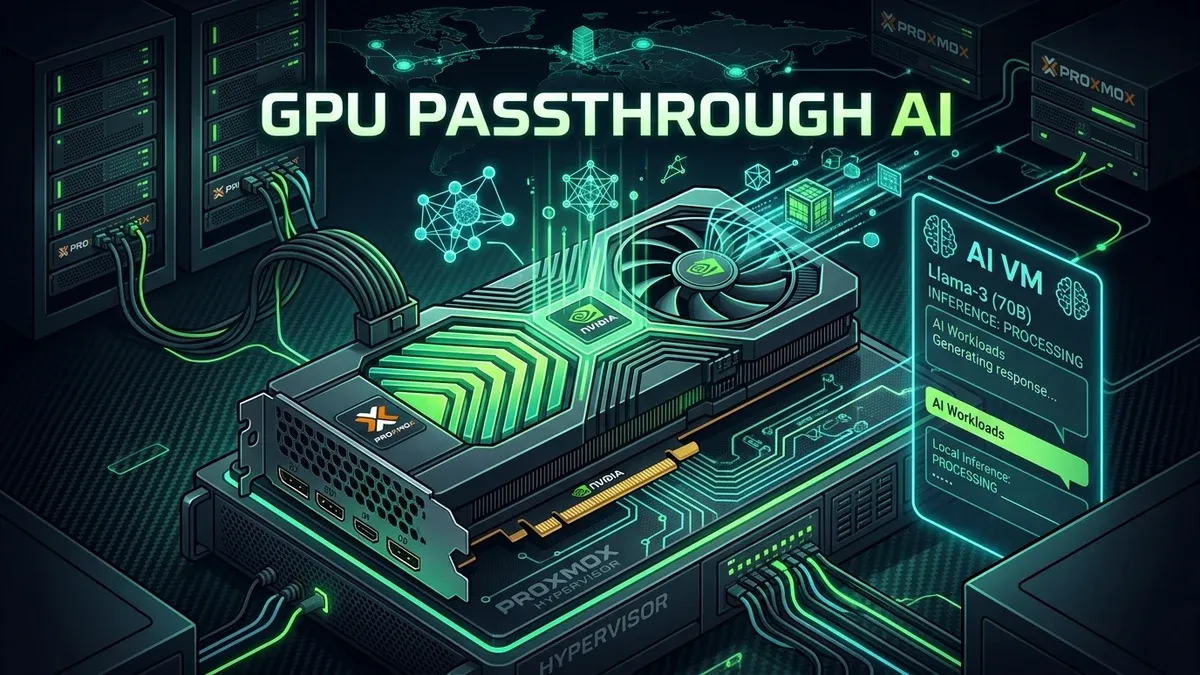
This is the setup we built for them, and the one I now run in my own lab. It covers the IOMMU configuration, the VFIO binding that stops the hypervisor from claiming the card, the VM parameters that make a guest believe it owns a physical GPU, and the toolchain that serves models on top of it.
What Passthrough Actually Does
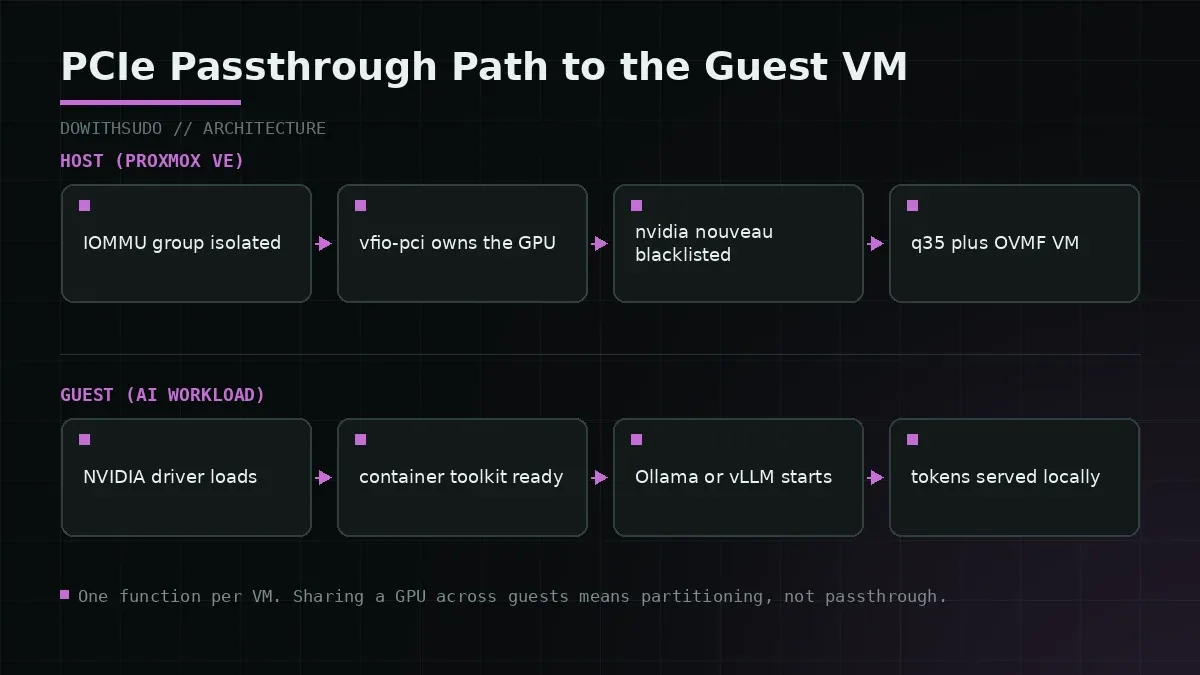
The hypervisor normally owns every PCIe device in the machine. It enumerates them at boot, binds a kernel driver, and exposes nothing of that driver to a guest. Virtual machines get emulated hardware, which is why a guest that asks nvidia-smi for a device gets an error.
VFIO changes the ownership model. You tell the kernel to unbind the GPU from its normal driver and hand the whole device, its BAR memory regions, and its interrupt lines to a userspace driver that can map them into a VM. The guest’s kernel then enumerates a real PCIe device and loads the real NVIDIA driver against it. The guest is not emulating a GPU. It has one, with the access latency and throughput of a bare metal card minus a small amount of translation overhead.
There is a hard constraint that catches nearly everyone. A device can only be handed over whole if every function in its IOMMU group is also handed over. The IOMMU group is the smallest unit of isolation the platform can enforce, and the chipset decides the grouping, not you. A GPU in a group with a USB controller, an audio function, or a chipset bridge gives you a choice between passing all of them and passing none.
| Approach | Isolation | Model load time | Host GPU use |
|---|---|---|---|
| Containers on the host | None, shared kernel | Fast | Shared with containers |
| vGPU with vendor licence | Strong, partitioning | Medium | Host keeps the card |
| Full PCIe passthrough | Strong, whole device | Medium | Host loses the card |
| MIG on datacenter cards | Strong, per instance | Fast | Other instances usable |
For a lab or a single tenant workload, full passthrough gives the most VRAM per dollar. The cost is that the host can no longer use the card for anything else, including its own console, which is why the prerequisite below is not negotiable.
Prerequisites: BIOS, IOMMU Groups, and a Second GPU
Turn on the platform features first. On an Intel board these are labelled VT-d and Above 4G Decoding. On AMD they are AMD-Vi or IOMMU, plus the same 4G decoding option. Enable Resizable BAR if the board offers it, since it improves the amount of VRAM the guest can map in a single aperture.
Then plan for the host’s own display. The moment you hand the GPU to a VM, the hypervisor loses it. If the machine has no integrated GPU or second discrete card, the host console goes dark and Proxmox has no local output. On server boards with BMC graphics this is fine, because the management controller keeps a framebuffer. On a gaming board without an iGPU, keep a cheap card in a second slot, or accept that the host is headless and reachable only over the network.
Finally, write down the PCI addresses of every function attached to the card. A modern NVIDIA card shows up as multiple devices, and passing only the VGA function leaves the audio function behind in the host.
lspci -nn | grep -Ei 'vga|3d|audio'01:00.0 VGA compatible controller [0300]: NVIDIA Corporation AD102 [GeForce RTX 4090] [10de:2684] (rev a1)
01:00.1 Audio device [0403]: NVIDIA Corporation AD102 High Definition Audio [10de:22ba] (rev a1)Those [10de:2684] and [10de:22ba] pairs are the vendor and device IDs you will bind to VFIO.
Step 1: Enable IOMMU and Bind the Card to VFIO
Tell the kernel to enable the IOMMU at boot. Use iommu=pt so devices that stay in the host keep using a pass-through identity map instead of a translation table, which reduces overhead for the rest of the machine.
cp /etc/default/grub /etc/default/grub.bak
sed -i 's/^GRUB_CMDLINE_LINUX_DEFAULT=.*/GRUB_CMDLINE_LINUX_DEFAULT="quiet intel_iommu=on iommu=pt"/' /etc/default/grub
# AMD hosts use: amd_iommu=on iommu=pt
update-grub
Load the VFIO modules at boot and blacklist the drivers the host would normally attach to the card.
cat > /etc/modules-load.d/vfio.conf <<'EOF'
vfio
vfio_iommu_type1
vfio_pci
vfio_virqfd
EOF

cat > /etc/modprobe.d/pve-blacklist.conf <<'EOF'
blacklist nvidia
blacklist nvidiafb
blacklist nouveau
softdep nvidia pre: vfio-pci
softdep nouveau pre: vfio-pci
EOF

cat > /etc/modprobe.d/vfio.conf <<'EOF'
options vfio-pci ids=10de:2684,10de:22ba disable_vga=1
EOF

update-initramfs -u -k all
Reboot and verify the binding. This check is the single most useful diagnostic in the whole process.
lspci -nnk -s 01:0001:00.0 VGA compatible controller [0300]: NVIDIA Corporation AD102 [GeForce RTX 4090] [10de:2684]
Subsystem: ASUSTeK Computer Inc. Device [1043:88e5]
Kernel driver in use: vfio-pci
Kernel modules: nvidiafb, nouveau, nvidia_drm, vfio_pci
01:00.1 Audio device [0403]: NVIDIA Corporation AD102 High Definition Audio [10de:22ba]
Kernel driver in use: vfio-pciIf Kernel driver in use still says nvidia or nouveau, the initramfs did not pick up your configuration. Run update-initramfs -u -k all again and check that the modules line appears in journalctl -b | grep -i vfio.
Now confirm the IOMMU group contains nothing but the card.
for g in $(find /sys/kernel/iommu_groups -maxdepth 1 -type d | sort -V); do
  echo "Group $(basename "$g"):"
  for d in "$g"/devices/*; do printf '  %s\n' "$(lspci -nns "${d##*/}")"; done
done | grep -A4 -B1 01:00
A group containing only 01:00.0 and 01:00.1 is clean. A group that also lists a bridge or a network controller means the platform will not isolate the card, and the usual escape hatch is the pcie_acs_override=downstream,multifunction kernel argument. Use it with care. It tells the kernel to pretend the topology supports isolation it does not, which weakens the boundary between the passed device and the rest of the machine. It is a lab compromise, not a datacenter answer.
Step 2: Build a VM That Can Own a PCIe Device
Create the VM with the q35 machine type and OVMF firmware, then attach the card. The q35 chipset provides a PCIe root complex that guest drivers expect, and OVMF is required for PCIe passthrough with modern cards.
qm create 200 --name ai-inference --memory 65536 --cores 16 --sockets 1 \
  --cpu host --machine q35 --bios ovmf --ostype l26 \
  --scsihw virtio-scsi-single --net0 virtio,bridge=vmbr0 \
  --efidisk0 local-lvm:1,format=raw,efitype=4m,pre-enrolled-keys=0
Then edit the configuration directly to add the GPU and the CPU flags that hide the hypervisor from vendor drivers.
# /etc/pve/qemu-server/200.conf
bios: ovmf
machine: q35
cpu: host,hidden=1,flags=+pcid
numa: 1
hostpci0: 0000:01:00,pcie=1,x-vga=1
efidisk0: local-lvm:vm-200-disk-0,format=raw,efitype=4m,pre-enrolled-keys=0
scsi0: local-lvm:vm-200-disk-1,format=raw,size=200G,ssd=1,iothread=1
memory: 65536
balloon: 0
Four parameters in that file do the real work.
hostpci0: 0000:01:00,pcie=1attaches every function of the card as a PCIe device. Omitting the function number passes all of them, which is what you want for a GPU with an audio function.x-vga=1gives the guest a legacy VGA path and makes the card usable as the primary display. Drop it if the guest is headless and you want to avoid the extra legacy resources.cpu: host,hidden=1exposes the host CPU model and hides the hypervisor CPUID bit. Vendor drivers behave more predictably with it set.balloon: 0disables memory ballooning. A ballooned guest can have pages reclaimed at the wrong moment, and with a 64 GB allocation on a 128 GB host that is a real risk during model load.
I also pin the VM’s vCPUs on busy hosts with taskset or systemd slice limits. For inference, latency comes from the GPU far more than the CPU, but token streaming threads are sensitive to scheduling jitter when the host is also running twenty other guests.
Step 3: Driver and Container Toolkit Inside the Guest
Inside the VM you are on bare metal as far as the GPU is concerned. Install the NVIDIA driver and the container toolkit exactly as you would on a workstation.
# Ubuntu 24.04 guest
sudo apt update && sudo apt install -y build-essential dkms linux-headers-$(uname -r)
sudo ubuntu-drivers install
sudo reboot

# After reboot, confirm the card is visible to the guest kernel.
nvidia-smi --query-gpu=name,memory.total,driver_version --format=csv
name, memory.total [MiB], driver_version
NVIDIA GeForce RTX 4090, 24564 MiB, 550.107.02If nvidia-smi reports No devices were found while lspci inside the guest shows the card, the driver did not attach. Check dmesg | grep -i nvrm inside the guest, and verify on the host that vfio-pci still owns the device. A host kernel update that regenerates the initramfs is the most common way to lose the binding.
Now install the container toolkit so containers can use the card.
curl -fsSL https://nvidia.github.io/libnvidia-container/gpgkey \
  | sudo gpg --dearmor -o /usr/share/keyrings/nvidia-container-toolkit-keyring.gpg
curl -sL https://nvidia.github.io/libnvidia-container/stable/deb/nvidia-container-toolkit.list \
  | sed 's#deb https://#deb [signed-by=/usr/share/keyrings/nvidia-container-toolkit-keyring.gpg] https://#' \
  | sudo tee /etc/apt/sources.list.d/nvidia-container-toolkit.list
sudo apt update && sudo apt install -y nvidia-container-toolkit
sudo nvidia-ctk runtime configure --runtime=docker
sudo systemctl restart docker
docker run --rm --gpus all nvidia/cuda:12.4.1-base-ubuntu22.04 nvidia-smi
That last command is the acceptance test. When it prints the same GPU table you saw on the host, the full chain works from physical PCIe device to container.
Step 4: Serve a Model and Measure It
With the GPU reachable from containers, running an inference server is a compose file and a model pull.
# docker-compose.yml inside the guest
services:
  ollama:
    image: ollama/ollama:latest
    container_name: ollama
    restart: unless-stopped
    ports:
      - "127.0.0.1:11434:11434"
    volumes:
      - ollama_models:/root/.ollama
    deploy:
      resources:
        reservations:
          devices:
            - driver: nvidia
              count: all
              capabilities: [gpu]

volumes:
  ollama_models:
docker compose up -d
docker exec -it ollama ollama pull qwen2.5:14b-instruct
docker exec -it ollama ollama run qwen2.5:14b-instruct "Summarise what an IOMMU group is in two sentences."
time docker exec -it ollama ollama run qwen2.5:14b-instruct "Write a haiku about disk failures."For higher throughput on a card with enough VRAM, vLLM batches requests far better than a single stream runtime.
docker run --rm --gpus all -p 127.0.0.1:8000:8000 \
  -v vllm_cache:/root/.cache/huggingface \
  vllm/vllm-openai:latest \
  --model Qwen/Qwen2.5-14B-Instruct \
  --gpu-memory-utilization 0.90 \
  --max-model-len 16384 \
  --tensor-parallel-size 1
Measure with the same prompt before and after any change to GPU memory utilisation or context length, because both parameters trade VRAM against concurrent requests. On the 24 GB card in this build, a 14B model in 4 bit precision leaves room for a 16K context window and several concurrent requests. A 32B model does not, and the failure mode is an out of memory error at request time rather than at startup.
Benchmark with your own prompt length distribution. A tokens per second figure from a short prompt tells you very little about the experience a user gets with a 4,000 token context.
The rest of the machine deserves attention too, because a host that runs both guests and GPUs is a bigger attack surface than a single purpose node. Kernel patching for the hypervisor is covered in our Proxmox CVE and patching guide, and if you manage the host through a web interface, keep it off the public internet as described in Proxmox Web UI access fixes.
Failure Modes and Troubleshooting
1. The VM refuses to start with the GPU attached
Symptom: qm start 200 fails with vfio: error, group 15 is not viable or the VM starts and the guest kernel logs BAR 1: no space for [mem size 0x...].
cat /sys/kernel/iommu_groups/15/devices/*/uevent 2>/dev/null
grep -i 'vfio\|iommu' /var/log/syslog | tail -20
A shared IOMMU group is the usual cause. Move the card to a different slot on a board where the CPU provides the lanes rather than the chipset, or enable Above 4G Decoding so the VM can map the BARs. The memory allocation failure is almost always a 4G decoding problem.
2. The guest loses the GPU after a host kernel update
Symptom: nvidia-smi fails inside the guest and lspci -nnk on the host shows the card bound to nvidia again.
lspci -nnk -s 01:00 | grep -i 'driver in use'Proxmox regenerates the initramfs on kernel upgrades, and if your vfio.conf lives outside the paths the build reads, the binding silently reverts. Keep the configuration in /etc/modprobe.d/ and add a check to your post-upgrade routine. On my lab hosts a systemd timer verifies the binding every morning and pages when the answer changes.
3. The host has no console output
Symptom: after binding the only GPU to VFIO, the local monitor shows nothing from the hypervisor and you cannot recover from a boot failure at the console.
# If a serial header exists, add console redirection at boot.
sed -i 's/^GRUB_CMDLINE_LINUX_DEFAULT=.*/GRUB_CMDLINE_LINUX_DEFAULT="quiet intel_iommu=on iommu=pt console=tty0 console=ttyS0,115200"/' /etc/default/grub
update-grub
Then enable serial over LAN in the BMC or use an iGPU for local console duty. This is a design decision rather than a bug, and it is much cheaper to make it before the card disappears.
Production Verification Checklist
| Check | Command | Expected |
|---|---|---|
| IOMMU active | dmesg | grep -i 'DMAR|AMD-Vi' | IOMMU enabled message |
| Card bound to VFIO | lspci -nnk -s 01:00 | Kernel driver in use: vfio-pci |
| Group isolated | ls /sys/kernel/iommu_groups/15/devices | Only GPU functions |
| VM machine type | grep machine /etc/pve/qemu-server/200.conf | q35 |
| Firmware type | grep bios /etc/pve/qemu-server/200.conf | ovmf |
| GPU in guest | nvidia-smi -L inside guest | Card name and UUID |
| Container access | docker run --rm --gpus all ... nvidia-smi | Same GPU table |
| Balloon disabled | grep balloon /etc/pve/qemu-server/200.conf | balloon: 0 |
| Binding survives reboot | reboot cycle | vfio-pci still owns the card |
| Inference measured | benchmark script | Tokens per second recorded |
Store the benchmark output somewhere versioned. When a driver update or a VRAM setting makes performance worse, having the previous number turns a vague feeling into a measurement.
Closing Thoughts
Local GPU inference is a capacity decision as much as a technical one. At a monthly rental cost in the low four figures, hardware pays back in months, and the same machine can host the rest of your lab. The setup work is real, mostly in the IOMMU and VFIO configuration, but it is a two hour project with a clear verification step at each stage rather than an ongoing operational burden.
One pattern worth stealing from teams that run this at scale is that they benchmark the model, not the hardware. The model architecture, quantisation, and context length decide whether a 24 GB card is enough, and the trade-offs involved are worth understanding before you buy anything, which is what our analysis of the DeepSeek V4.1 Flash architecture covers. Pick the model first, size the VRAM from there, then spend a weekend making the hypervisor hand over the card you bought.
Implementation Checklist
- Replicate the steps in a controlled lab before production changes.
- Document configs, versions, and rollback steps.
- Set monitoring + alerts for the components you changed.
- Review access permissions and least-privilege policies.
Official References
Need a Hand?
If you want this implemented safely in production, I can help with assessment, execution, and hardening.
Contact MeNeed an Offsite Backup Node or Corosync QDevice?
Deploy an independent cloud Droplet to act as a lightweight Corosync QDevice tiebreaker, remote PBS backup sync relay, or isolated test environment with $200 in free credits.
Transparency: We independently test and operate all recommended infrastructure. If you use our partner links, you receive free promotional credits and support our testing lab at zero extra cost to you.
Weekly Production DevOps Runbooks
Join 1,000+ infrastructure engineers receiving real-world Linux troubleshooting, Proxmox clustering setups, and Docker optimization runbooks every Tuesday. Zero spam, unsubscribe anytime.
About the Author
Kamandanu Wijaya
IT Infrastructure & Network Administrator
Infrastructure & network administrator with 15+ years of enterprise experience, focused on stability, security, and automation.
Certifications: Google IT Support, Cisco Networking Academy, DevOps.
Proxmox Mail Gateway Setup for Inbound Email Spam Defense
next →Proxmox SDN and Firewall Rules for Strict Virtual Network
Need IT Solutions?
DoWithSudo is ready to help setup servers, VPS, and your security systems.
Contact Us