LVM Storage Recovery: Missing Volume Groups and Disks
[ info ] // Meta
Category
DevOpsHave you ever felt that cold shiver down your spine when you realize your main database server has suddenly died and refuses to come back to life? That was my reality last week.
It all started with a mundane “Disk Usage Warning” alert. But when I logged in to check, the situation was far worse. The /var/lib/mysql directory was completely empty. The mount point was gone. And when I tried to reboot the server, it got stuck in emergency mode.
The culprit? A failure at the LVM (Logical Volume Manager) layer. One of the physical disks was deemed “missing” by the system, causing the entire Volume Group to become inconsistent.
Let me dissect the incident step by step, from the initial panic and wrong diagnoses to finally recovering the system with LVM commands rarely touched in daily operations.
Early symptoms: where is my data?
That morning, our main web application reported a “Database Connection Error”. My initial assumption was standard: maybe the MySQL service crashed.
I tried to start it manually:
sudo systemctl start mysqlFailed. The error log in /var/log/syslog stated: Directory /var/lib/mysql not found.
My heart started beating faster. I checked the list of mount points:
df -hSure enough, the partition that was supposed to mount that data directory was missing from the list.
Investigating layer by layer
In Linux, storage is like a layer cake. You have to check it from the bottom up.
Check physical disk (bottom layer)
I used lsblk to see if the operating system could still detect the physical hard disks.
lsblkThe result:
NAME    MAJ:MIN RM  SIZE RO TYPE MOUNTPOINT
sda       8:0    0   50G  0 disk
├─sda1    8:1    0  500M  0 part /boot
└─sda2    8:2    0 49.5G  0 part /
sdb       8:16   0  100G  0 disk
└─sdb1    8:17   0  100G  0 part
Disk /dev/sdb (the data disk) was still detected. This was good news. It meant the disk hadn’t exploded or physically vanished.
Check lvm (middle layer)
This is where the problem became clear. I ran the pvs (Physical Volume Scan) command to look at the LVM disk status.
sudo pvsThe output made me weak in the knees:
  PV         VG        Fmt  Attr PSize    PFree
  /dev/sda2  rootvg    lvm2 a--    49.50g    0
  unknown    datavg    lvm2 a-m   100.00g    0
Notice the word unknown and the attribute a-m (m = missing). LVM knew there was a member of the datavg group missing, but it couldn’t find /dev/sdb1 which was supposed to be that member.
Because one of its members was “missing”, LVM automatically deactivated all Logical Volumes on top of it to protect data integrity.
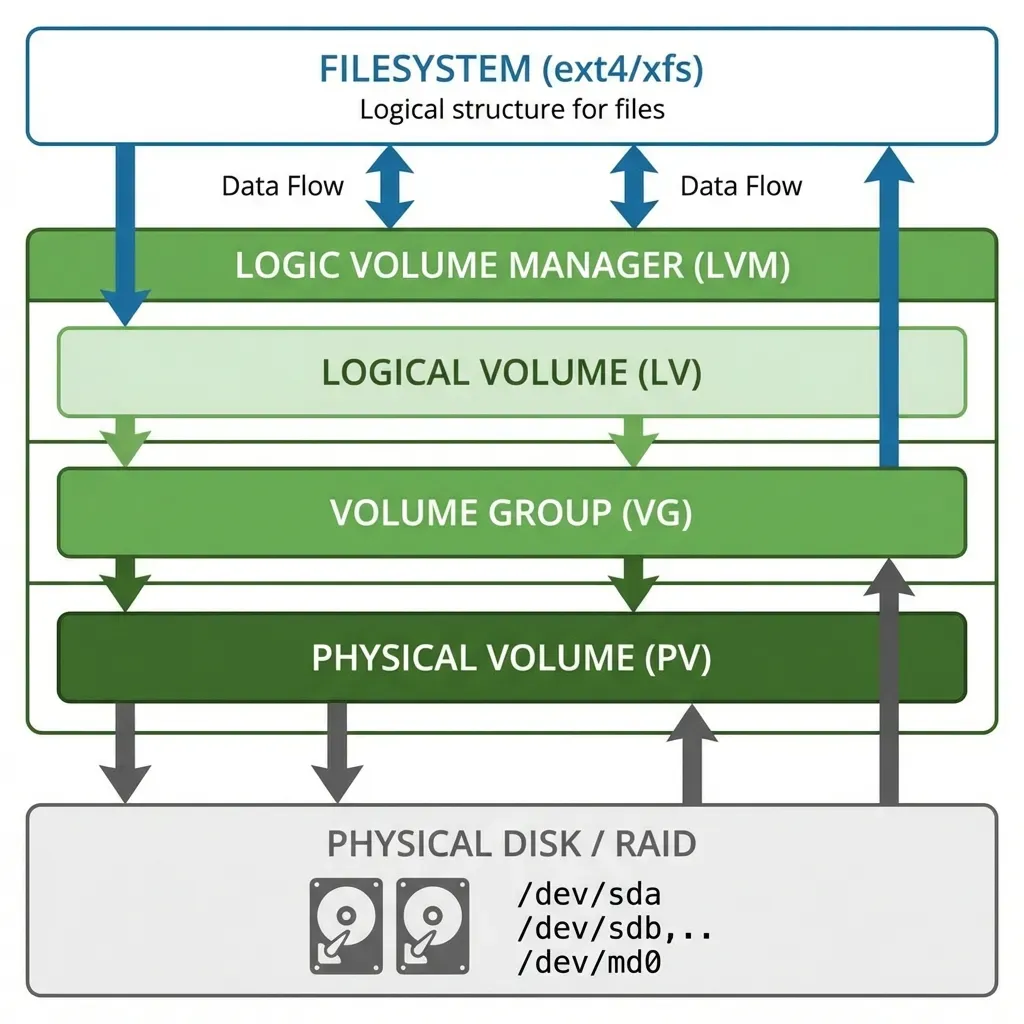
Anatomy of LVM: what the layers mean
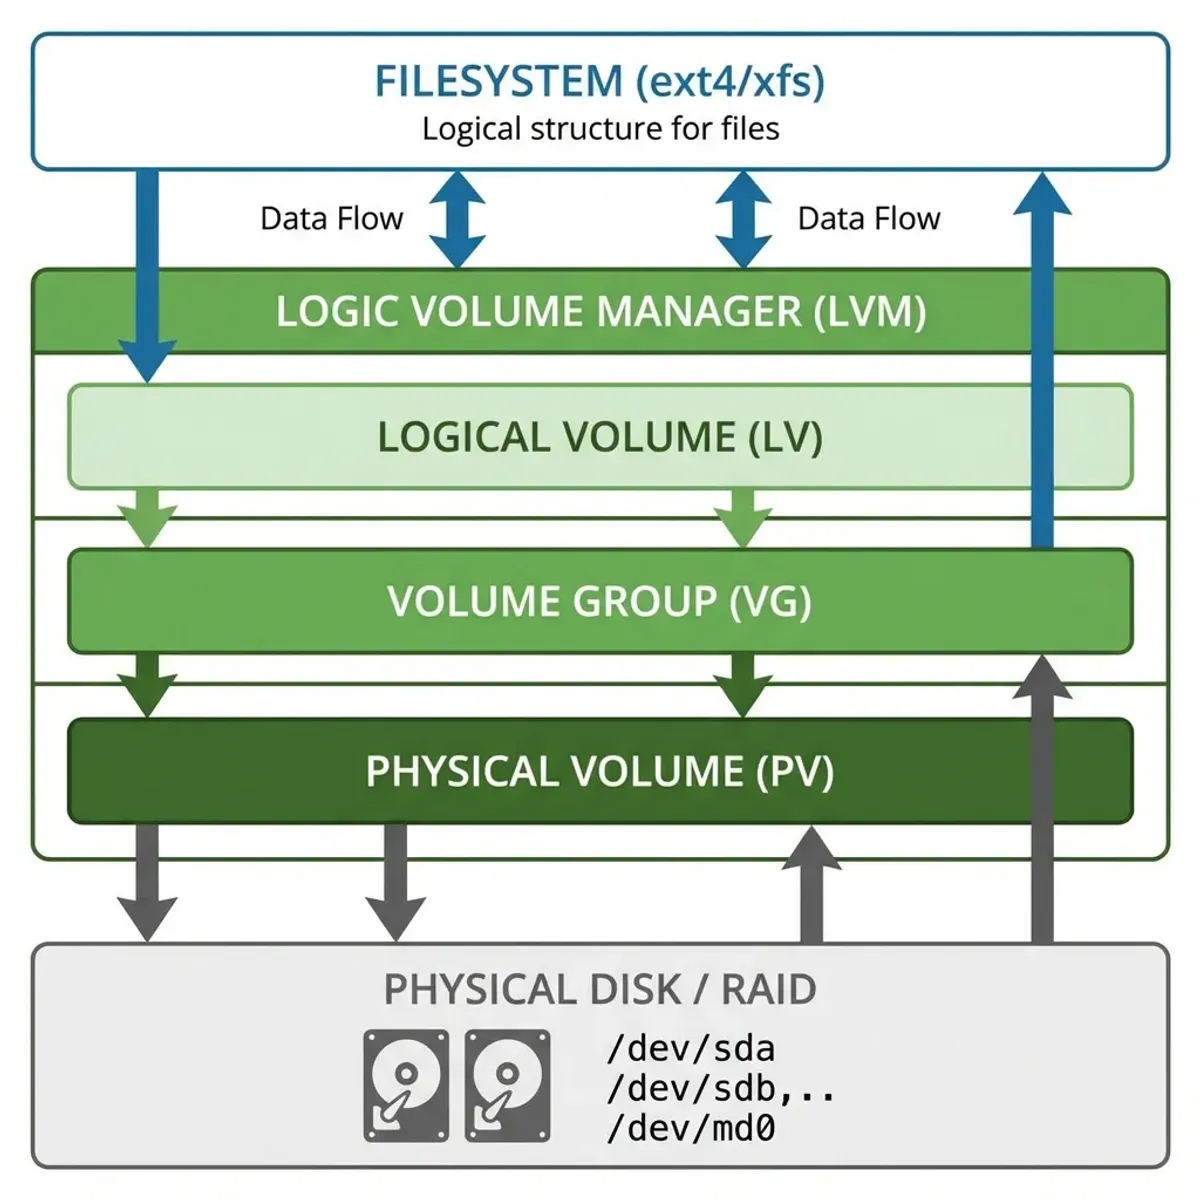
Before the recovery steps make sense, it helps to see the stack as a whole. LVM sits between the filesystem and the raw disk, adding an indirection layer that makes storage flexible, and when it breaks, confusing.
| Layer | Command | Role |
|---|---|---|
| Physical Volume (PV) | pvdisplay, pvs | A disk or partition LVM claims |
| Volume Group (VG) | vgdisplay, vgs | A pool of PVs grouped together |
| Logical Volume (LV) | lvdisplay, lvs | A virtual partition carved from the VG |
| Filesystem | df -h, mount | What the application actually sees |
A filesystem sits on an LV, which sits on a VG, which sits on one or more PVs. Break any link and the layer above loses its foundation. In this incident, the PV became “unknown”, so the VG went inconsistent, so the LV deactivated, so the mount point vanished. The data was never gone, it was just locked behind a broken link in the chain.
Why did this happen?
After digging through dmesg, I found many I/O error messages on /dev/sdb.
dmesg | grep sdbIt turned out the disk was a virtual volume (in a VMware environment) that had experienced a momentary detach due to a hiccup on the hypervisor storage side. Even though the disk had reconnected, LVM metadata had already marked it as “failed/missing”.
Recovery steps
Don’t rush to run disk repair commands like fsck because the problem isn’t with the filesystem, but with its container (LVM).
Step 1: rescan
I tried telling LVM to rescan all available block devices.
sudo pvscanOutput:
  PV /dev/sda2   VG rootvg   lvm2 [49.50 GiB / 0    free]
  PV /dev/sdb1   VG datavg   lvm2 [100.00 GiB / 0    free]
Magic! /dev/sdb1 was detected again. However, the Volume Group datavg was not yet active.
If your pvscan comes back empty while lsblk still shows the disk, the problem is usually a device filter or a stale LVM cache rather than a dead disk. Follow our comprehensive guide on pvscan not finding disk for step-by-step filter debugging.
Step 2: check volume group status
sudo vgsNow the status showed nothing “missing”, but the Logical Volume (LV) inside it was still inactive.
Step 3: re-activate volume
This was the decisive moment. I had to force LVM to reactivate the volume.
sudo vgchange -ay datavg-a= activatey= yes
Output:
1 logical volume(s) in volume group "datavg" now active
Step 4: mount and verify
Now the device /dev/datavg/mylv reappeared. I mounted it carefully.
sudo mount /dev/datavg/mylv /var/lib/mysqlI held my breath while checking the contents:
ls -l /var/lib/mysqlAll files were there! .ibd, .frm, everything complete.
Prevention: Monitoring LVM proactively
The most painful part of this incident was realizing I could have caught it earlier. LVM broadcasts warnings through dmesg and /var/log/syslog days before a full failure, but nobody was watching.
Here is what I set up immediately after recovery:
Monitor PV status with a cron script
#!/bin/bash
# /etc/cron.hourly/lvm-health
pvs --noheadings -o pv_name,pv_attr 2>&1 | grep -v 'a--' | \
  mail -s "LVM Alert: Non-optimal PV status on $(hostname)" admin@example.com
A PV with attribute a-m (missing) or a-- should never appear. If this script sends an email, you have a storage problem.
Track VG free space trends
#!/bin/bash
# /etc/cron.daily/lvm-capacity
vgs --noheadings --units g -o vg_name,vg_free >> /var/log/lvm-capacity.log
Over time, this log tells you whether a volume group is filling up, long before df -h reports 100% on any mount point.
Include LVM in your monitoring stack
Nagios, Zabbix, or Prometheus can all check LVM status via custom scripts. At minimum, alert on:
- Missing physical volumes (
pvsshowsunknown) - Volume groups with reduced active PV count (
vgsshows mismatched#PVvsAttached PV) - Logical volumes approaching capacity (
lvsshowsData%near 95% or higher)
Alternate scenario: When a PV is truly dead
In my case, the disk came back. But what if it does not? Here is what I prepared after this incident.
If a physical disk is permanently failed (clicking noises, SMART errors, no response):
# Replace the failed disk physically, then extend the VG
sudo pvcreate /dev/sdc      # new replacement disk
sudo vgextend datavg /dev/sdc
sudo pvmove /dev/sdb /dev/sdc   # migrate data off failed PV
sudo vgreduce datavg /dev/sdb    # remove failed PV from VG
The pvmove step runs online. The volume stays mounted and serving data during the entire migration. This is why LVM is used in production: it gives you the ability to hot-swap storage without downtime.
FAQ from the field
Is my data gone when a PV shows as “unknown”? Almost always no. LVM marks the PV missing to protect the volume group from writing to a half-present disk. The data is still on the disk, waiting for the PV to be reattached and the VG reactivated.
Can I recover without a backup? Sometimes, and this case is proof. But do not read that as permission to skip backups. Recovery works when the disk itself survived. A dead disk with no backup is unrecoverable, no matter how many LVM commands you know.
Why did a momentary detach trigger this? LVM treats “can’t reach the PV” as “PV is dead” to protect data integrity. It cannot distinguish a transient hypervisor hiccup from a real failure until you run pvscan and give it a chance to re-discover the device.
Vital lessons
This incident taught me that:
- Monitoring the LVM Layer is Critical: I had only been monitoring Disk Space (df -h). I forgot to monitor LVM status (
vgsorlvs). If I had known the disk was flapping, I could have acted sooner. - Don’t Panic: When a directory vanishes, the first instinct is often “reformat” or “restore from backup”. In reality, the data is often still there, just inside a locked container.
- Partition Documentation: I was incredibly grateful to have server notes explaining what was on
/dev/sdb. Without them, I might have been guessing which disk was the problem. - Test Recovery Procedures: After the recovery, I deliberately detached a test VM disk and practiced this procedure twice. Do not wait for a real emergency to learn LVM commands under pressure.
Storage troubleshooting requires layer by layer understanding. If you successfully reactivate your volume group but the underlying filesystem refuses to mount with bad magic number errors, follow our emergency runbook on repairing corrupted Linux bad superblocks on Ext4 and XFS. The same diagnostic approach applies when handling Docker container crashes. And to prevent issues in the future, make sure your server is properly hardened. For the broader Linux survival toolkit, permissions, processes, and storage from the ground up, my basic Linux for system administrators guide is where the foundation lives.
Now, whenever there’s a disk alert, the first thing I type isn’t reboot, but lsblk and pvs. Understand the layers, and you will find the solution.
Implementation Checklist
- Replicate the steps in a controlled lab before production changes.
- Document configs, versions, and rollback steps.
- Set monitoring + alerts for the components you changed.
- Review access permissions and least-privilege policies.
Official References
Need a Hand?
If you want this implemented safely in production, I can help with assessment, execution, and hardening.
Contact MeDeploy on Cloud Infrastructure with $200 Free Credit
Spin up high-performance SSD cloud Droplets, managed Kubernetes, and databases in seconds. Test your containers and production workloads with $200 in free credits.
Transparency: We independently test and operate all recommended infrastructure. If you use our partner links, you receive free promotional credits and support our testing lab at zero extra cost to you.
Weekly Production DevOps Runbooks
Join 1,000+ infrastructure engineers receiving real-world Linux troubleshooting, Proxmox clustering setups, and Docker optimization runbooks every Tuesday. Zero spam, unsubscribe anytime.

About the Author
Kamandanu Wijaya
IT Infrastructure & Network Administrator
Infrastructure & network administrator with 15+ years of enterprise experience, focused on stability, security, and automation.
Certifications: Google IT Support, Cisco Networking Academy, DevOps.
Linux Server Hardening Best Practices
next →Learning Docker from Scratch: Step-by-Step Practical Guide
Need IT Solutions?
DoWithSudo is ready to help setup servers, VPS, and your security systems.
Contact Us