Build Minimal Docker Images: Scratch and Distroless Guide
[ info ] // Meta
Category
DevOpsI remember the first time I saw FROM scratch in a Dockerfile. I thought it was a joke. An empty base image? How do you build anything from nothing? It felt like being asked to cook a meal on an empty counter with no ingredients and no stove.
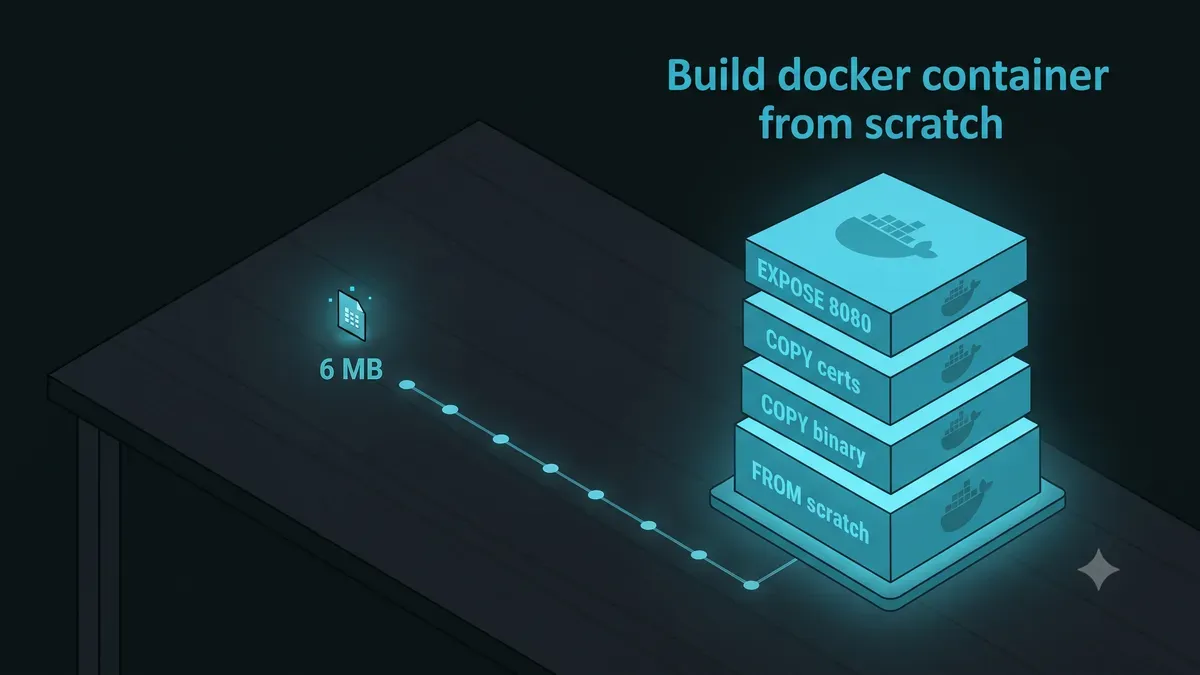
But that is exactly the point. An empty counter means nothing unnecessary comes along for the ride. No package manager, no shell, no libraries you will never use. Just your binary and the Linux kernel calls it makes. The image I built that day was 6 MB. The same application built on Ubuntu weighed 180 MB. Both did the same thing, and the smaller one had zero attack surface beyond the application code itself.
This guide shows you how to build a container from actual scratch, why you would want to, and the practical trade-offs that determine whether scratch is the right choice or a premature optimization.
If you need a comprehensive reference on container runtimes and Compose, consult our Docker production guide. This article assumes you understand basic container concepts and focuses on building minimal distroless images.
What “FROM scratch” actually means
FROM scratch is an empty layer. No filesystem, no binaries, no libraries, no shell, no package manager. The Docker documentation calls it a reserved word that signals “I am starting from zero.” It is not a real image you can pull or inspect. It is a marker that tells Docker the first layer of your image has nothing in it.
When you build an image starting from scratch, the only thing in the final image is what you explicitly copy in. That is why it is the most secure base image possible. There is nothing to exploit, no shell to drop into, no vulnerable OpenSSL version to patch.
The trade-off is that your application must be a static binary. It cannot depend on shared libraries at runtime, because there are none. If your app needs libc, libssl, or any shared library, it must either be statically linked into the binary or you must copy the libraries into the image manually.
This is the entire reason scratch images are most common in the Go ecosystem. Go compiles static binaries by default. C, Rust, and Zig can also produce static binaries with the right flags. Python, Node.js, and Ruby applications cannot run from scratch, because they need an interpreter and a runtime.
Static binary: the foundation of a scratch container
Before you can run anything from scratch, you need a binary that does not depend on shared libraries at runtime. Here is how different languages handle this.
Go (the easiest path)
Go is the language that made scratch containers popular. A standard build produces a static binary with no external dependencies.
FROM golang:1.23 AS builder
WORKDIR /app
COPY go.mod go.sum ./
RUN go mod download
COPY . .
RUN CGO_ENABLED=0 GOOS=linux go build -o /app/server .

FROM scratch
COPY --from=builder /app/server /server
EXPOSE 8080
CMD ["/server"]
The CGO_ENABLED=0 flag is critical. It tells the Go compiler to use the pure Go implementation of the network resolver and system calls, instead of linking against glibc. Without it, the binary becomes dynamically linked and will fail to run on scratch.
Rust
Rust requires the x86_64-unknown-linux-musl target to produce a fully static binary.
FROM rust:1.80 AS builder
WORKDIR /app
COPY Cargo.toml Cargo.lock ./
RUN mkdir src && echo "fn main() {}" > src/main.rs
RUN cargo build --release --target x86_64-unknown-linux-musl
COPY src/ src/
RUN cargo build --release --target x86_64-unknown-linux-musl

FROM scratch
COPY --from=builder /app/target/x86_64-unknown-linux-musl/release/myapp /myapp
CMD ["/myapp"]
C
A C program can be compiled statically by linking against musl or using the -static flag with gcc.
FROM gcc:14 AS builder
WORKDIR /app
COPY hello.c .
RUN gcc -static -o hello hello.c

FROM scratch
COPY --from=builder /app/hello /hello
CMD ["/hello"]
The -static flag tells gcc to embed all libraries into the binary. The resulting image contains exactly one file and nothing else.
Multi-stage builds: the practical workflow
You rarely want to compile inside a scratch image. You cannot, because scratch has no compiler. The standard pattern is a multi-stage build, where the first stage contains the full toolchain and the second stage is scratch.
# Stage 1: build
FROM golang:1.23 AS builder
WORKDIR /app
COPY go.mod go.sum ./
RUN go mod download
COPY . .
RUN CGO_ENABLED=0 GOOS=linux go build -o /app/api .

# Stage 2: minimal runtime
FROM scratch
COPY --from=builder /app/api /api
COPY --from=builder /etc/ssl/certs/ca-certificates.crt /etc/ssl/certs/
EXPOSE 8080
CMD ["/api"]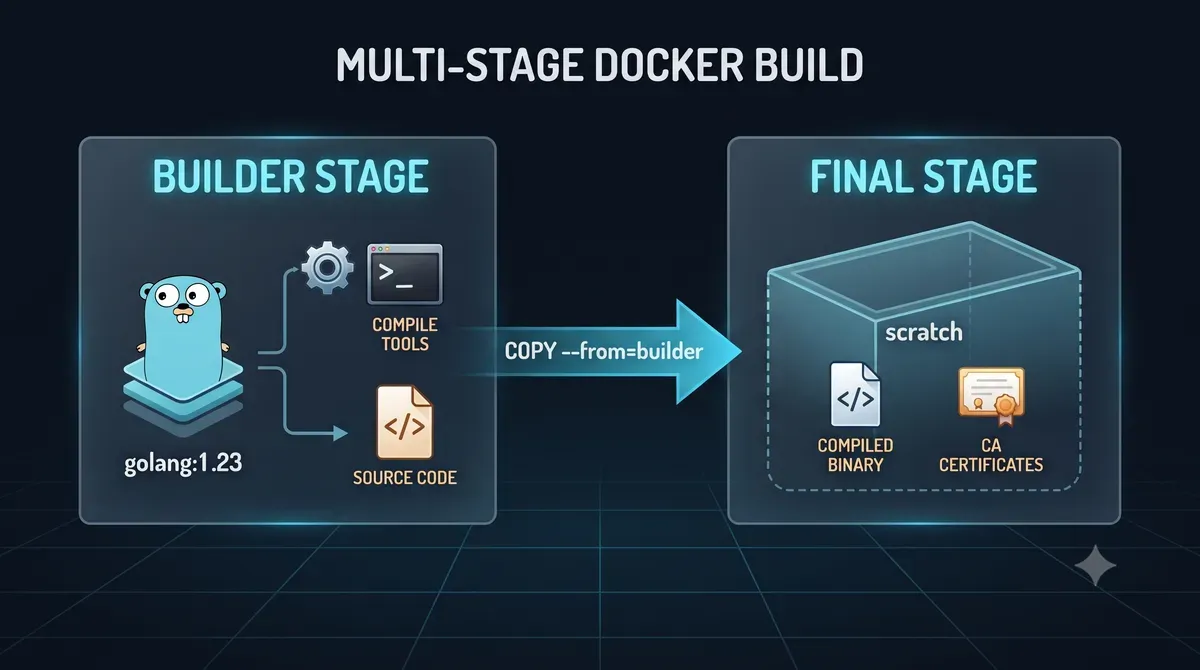
The extra line copying CA certificates is worth separate attention. A scratch image has no TLS trust store. If your application makes HTTPS calls to external services, it needs root certificates. The cleanest source is the builder stage, which has them from the base image.
When you need more than just the binary
Some applications need more than a single binary, even when compiled statically.
- Timezone data: Copy
/usr/share/zoneinfoif your app uses time zones. - CA certificates: Copy
/etc/ssl/certs/ca-certificates.crtfor HTTPS. - Configuration files: Copy them explicitly, or better, mount them at runtime.
- /tmp directory: Create
/tmpin the scratch image if your app writes temporary files.
FROM scratch
COPY --from=builder /app/server /server
COPY --from=builder /etc/ssl/certs/ca-certificates.crt /etc/ssl/certs/
COPY --from=builder /usr/share/zoneinfo /usr/share/zoneinfo
COPY config/prod.yaml /config.yaml
EXPOSE 8080
CMD ["/server"]
Distroless: the pragmatic middle ground
Scratch is not always the right answer. If your application is written in Python, Node.js, or Java, you cannot run it from scratch. You need a runtime. But you do not need a full operating system.
Google publishes distroless base images. They contain your language runtime and its minimal dependencies, but no shell, no package manager, and no utilities. The result is a much smaller image than a full Linux distribution, with a fraction of the attack surface.
FROM node:20 AS build
WORKDIR /app
COPY package.json package-lock.json ./
RUN npm ci
COPY . .
RUN npm run build

FROM gcr.io/distroless/nodejs20-debian12
COPY --from=build /app/dist /app
CMD ["/app/server.js"]
The distroless image has Node.js, the app code, and nothing else. No apt, no curl, no bash. If someone gains code execution in the container, there is no shell to escalate from.
A comparison of final image sizes tells the story:
| Base image | Size | Shell | Package manager | Use case |
|---|---|---|---|---|
ubuntu:24.04 | 78 MB | bash | apt | Development, full OS needed |
alpine:3.20 | 7 MB | sh | apk | Small, but has attack surface |
distroless/nodejs | 120 MB | none | none | Node.js in production |
scratch + Go binary | 6 MB | none | none | Go, Rust, static C |
The distroless images are fatter than scratch, but they support interpreted languages. They are the right choice for production Node.js, Python, and Java applications where you want minimalism without rewriting everything in Go.
Security benefits of minimal images
Smaller images are not just about faster downloads. Every file in an image is a potential attack vector. The fewer files, the fewer things an attacker can use.
A typical Ubuntu-based image contains tens of thousands of files. Many of them have known CVEs. Running trivy image on a Ubuntu-based image often returns dozens of vulnerabilities, even if the application code is clean. The same scan on a scratch image returns zero, because there is nothing to scan beyond the application binary.
The practical security advantages are:
- No shell: If an attacker exploits a vulnerability in your application, they cannot access a shell. There is no
/bin/sh, no/bin/bash, noapt, nocurl. - No privilege escalation tools: There is no
sudo, nosu, no setuid binaries. - No known CVEs in system packages: There are no system packages. The only thing to audit is your application.
- Smallest blast radius: Even if the container is compromised, the attacker cannot use it to pivot to other systems, because they lack the tools to do so.
The container side of security starts with the base image, and scratch is the smallest possible starting point.
When NOT to use scratch
Scratch is a tool, not a badge of honor. There are situations where it causes more problems than it solves.
Interpreted languages: Python, Node.js, Ruby, and PHP applications need a runtime. You cannot run them from scratch. Use distroless or alpine instead.
Debugging requirements: If you need to exec into a running container to troubleshoot, scratch containers will not let you. There is no shell to exec into. In production, you should not be execing into containers anyway, but during development and staging, it can be a blocker.
Complex startup scripts: If your application needs multiple init steps, like waiting for a database, running migrations, and then starting the server, you need a shell or a process manager inside the container. Distroless or alpine handles this better.
Third-party binaries that are not static: Many vendor-provided tools, like database clients or monitoring agents, are distributed as dynamically linked binaries. You cannot run them on scratch without copying the required shared libraries.
The rule of thumb is simple. If you can compile your application into a single static binary, use scratch. If you cannot, use distroless. If you need debugging access or complex startup logic, use alpine. If you need a full OS, use Ubuntu or Debian, but understand what you are accepting.
Putting it together: a complete example
Here is a real-world example combining everything in this guide. A Go HTTP server that serves an API, compiled statically, running on scratch, with TLS certificates and timezone data.
The project structure:
.
├── main.go
├── go.mod
├── Dockerfile
└── .dockerignore
The main.go file:
package main

import (
    "fmt"
    "log"
    "net/http"
    "os"
    "time"
)

func handler(w http.ResponseWriter, r *http.Request) {
    currentTime := time.Now().Format(time.RFC1123)
    hostname, _ := os.Hostname()
    fmt.Fprintf(w, "Server: %s, Time: %s", hostname, currentTime)
}

func main() {
    http.HandleFunc("/", handler)
    log.Println("Starting on :8080")
    log.Fatal(http.ListenAndServe(":8080", nil))
}
The .dockerignore file:
.git
*.md
*.test.go
The Dockerfile:
FROM golang:1.23 AS builder
WORKDIR /app
COPY go.mod go.sum ./
RUN go mod download
COPY . .
RUN CGO_ENABLED=0 GOOS=linux go build -o /app/server .

FROM scratch
COPY --from=builder /app/server /server
COPY --from=builder /etc/ssl/certs/ca-certificates.crt /etc/ssl/certs/
COPY --from=builder /usr/share/zoneinfo /usr/share/zoneinfo
EXPOSE 8080
CMD ["/server"]
Build and run it:
docker build -t my-scratch-app .
docker run -d -p 8080:8080 my-scratch-app
Check the image size:
docker images my-scratch-appThe output should show around 12 MB, including Go binary, TLS certs, and timezone data. Without the extra files, the binary alone would be around 6 MB.
Now check the surface area:
docker run --rm my-scratch-app ls /The command fails. There is no ls, no shell, nothing to list. The container is as close to immutable as a filesystem can get.
The debugging workflow for scratch containers
When something breaks in a scratch container, you cannot exec into it. Here is how to diagnose problems without a shell.
Check the startup logs:
docker logs my-scratch-appInspect the container state:
docker inspect my-scratch-app --format '{{.State.Status}} Exit={{.State.ExitCode}}'Test the health endpoint externally:
curl -v http://localhost:8080/If the container exits immediately, rebuild with debug flags:
A common pattern is to keep a debug variant of the Dockerfile that uses a full base image for the final stage. You switch between them with build arguments.
ARG BASE_IMAGE=scratch

FROM golang:1.23 AS builder
WORKDIR /app
COPY go.mod go.sum ./
RUN go mod download
COPY . .
RUN CGO_ENABLED=0 GOOS=linux go build -o /app/server .

FROM ${BASE_IMAGE}
COPY --from=builder /app/server /server
CMD ["/server"]
Build for debugging:
docker build --build-arg BASE_IMAGE=alpine:3.20 -t my-scratch-app:debug .
docker run -it --entrypoint sh my-scratch-app:debug
This technique keeps the production image minimal while giving you a debugging escape hatch during development.
What the complete pipeline looks like
Scratch images fit naturally into a CI/CD pipeline where the build stage runs in a container with a full toolchain, and the final artifact is a minimal image pushed to a registry.
A minimal GitHub Actions workflow for a Go scratch container:
name: build-and-push
on:
  push:
    branches: [main]
jobs:
  build:
    runs-on: ubuntu-latest
    steps:
      - uses: actions/checkout@v4
      - uses: docker/setup-buildx-action@v3
      - uses: docker/login-action@v3
        with:
          registry: ghcr.io
          username: ${{ github.actor }}
          password: ${{ secrets.GITHUB_TOKEN }}

      - name: Build and push
        uses: docker/build-push-action@v6
        with:
          push: true
          tags: ghcr.io/${{ github.repository }}:latest

      - name: Scan image
        uses: aquasecurity/trivy-action@master
        with:
          image-ref: ghcr.io/${{ github.repository }}:latest
          severity: HIGH,CRITICAL
          exit-code: "1"
The scan step is the payoff. Running Trivy on a scratch image should return zero vulnerabilities. If it does not, something is wrong in the files you copied in.
The right call for your stack
Scratch is not the default for every project, and it should not be. The decision depends on your language, your team’s operational maturity, and whether the security savings justify the debugging friction.
For Go, Rust, and Zig microservices, scratch is the obvious default. There is no reason to carry a 100 MB operating system when a 6 MB binary does the same work. For Node.js, Python, and Java, distroless is the pragmatic equivalent. For everything else, alpine is a reasonable compromise.
If you are just getting started, our docker getting started tutorial walks through the basics before you attempt scratch images. And when you are automating infrastructure at scale, Ansible handles the host configuration on top of it.
The 6 MB image I built that day taught me something that stuck. Every unnecessary file in an image is an unnecessary risk. When you build from scratch, you decide exactly what goes in, and you decide exactly what stays out. That is the cleanest security policy there is.
I hope this guide helps you build smaller, more secure container images for your own projects.
Implementation Checklist
- Replicate the steps in a controlled lab before production changes.
- Document configs, versions, and rollback steps.
- Set monitoring + alerts for the components you changed.
- Review access permissions and least-privilege policies.
Official References
Need a Hand?
If you want this implemented safely in production, I can help with assessment, execution, and hardening.
Contact MeDeploy on Cloud Infrastructure with $200 Free Credit
Spin up high-performance SSD cloud Droplets, managed Kubernetes, and databases in seconds. Test your containers and production workloads with $200 in free credits.
Transparency: We independently test and operate all recommended infrastructure. If you use our partner links, you receive free promotional credits and support our testing lab at zero extra cost to you.
Weekly Production DevOps Runbooks
Join 1,000+ infrastructure engineers receiving real-world Linux troubleshooting, Proxmox clustering setups, and Docker optimization runbooks every Tuesday. Zero spam, unsubscribe anytime.
About the Author
Kamandanu Wijaya
IT Infrastructure & Network Administrator
Infrastructure & network administrator with 15+ years of enterprise experience, focused on stability, security, and automation.
Certifications: Google IT Support, Cisco Networking Academy, DevOps.
Docker vs Kubernetes: Which One Do You Actually Need?
next →Docker Production Guide: Containers, Compose and Volumes
Need IT Solutions?
DoWithSudo is ready to help setup servers, VPS, and your security systems.
Contact Us