Learning Docker from Scratch, A Comprehensive Guide for Beginners
Have you ever experienced this classic scenario? You write code on your laptop, and everything runs perfectly. But the moment you hand it over to a colleague or deploy it to a server, everything crashes. And then comes the legendary excuse “But it works on my machine!”
In this article, we cover Docker basics in a practical way so you can apply it with confidence.
It’s frustrating, right? The problem is often not your code, but the environment. Maybe the Node.js version is different, the database config doesn’t match, or the OS is a different distro.
Enter Docker. It exists to solve this environment drama once and for all. If you are in IT whether as a Sysadmin or a Developer Docker is no longer just a “nice to have” skill, it’s a necessity.
Let’s dive into what Docker is, why it’s everywhere, and how to use it, step by step, with a clear technical focus.
What is Docker, really?
Ideally: Docker is Tupperware for your applications.
Imagine you want to deliver food (your app) to a friend’s house (the server). If you carry the food on an open plate while riding a motorcycle, it might spill or get dusty by the time you arrive.
But if you seal that food in a Tupperware container, you can transport it by bike, car, or plane, and it will arrive safe, intact, and tasting exactly the same.
In the tech world, Docker “wraps” your application along with everything it needs (libraries, configs, dependencies) into a neat package called a Container.
Containers vs. virtual machines (vm)
You might be thinking, “Wait, isn’t that what VMs (like VirtualBox/VMware) do?”
Similar goal, but very different approach.
- Virtual Machine (VM): Heavy. Each VM requires a full OS installation (Guest OS). So if you have 3 apps, you need 3 full copies of Windows/Linux running. This eats up RAM and CPU.
- Docker Container: Lightweight. Containers share the host OS kernel. You don’t need to install a new OS inside, you just pack the application binaries. Boot time is seconds, not minutes.

How Docker works (short but technical)
Docker relies on two core Linux features:
- Namespaces: isolate processes, network, filesystem, and users so containers feel like mini-VMs.
- Cgroups: control resource limits (CPU, RAM, I/O) so one container can’t hog the host.
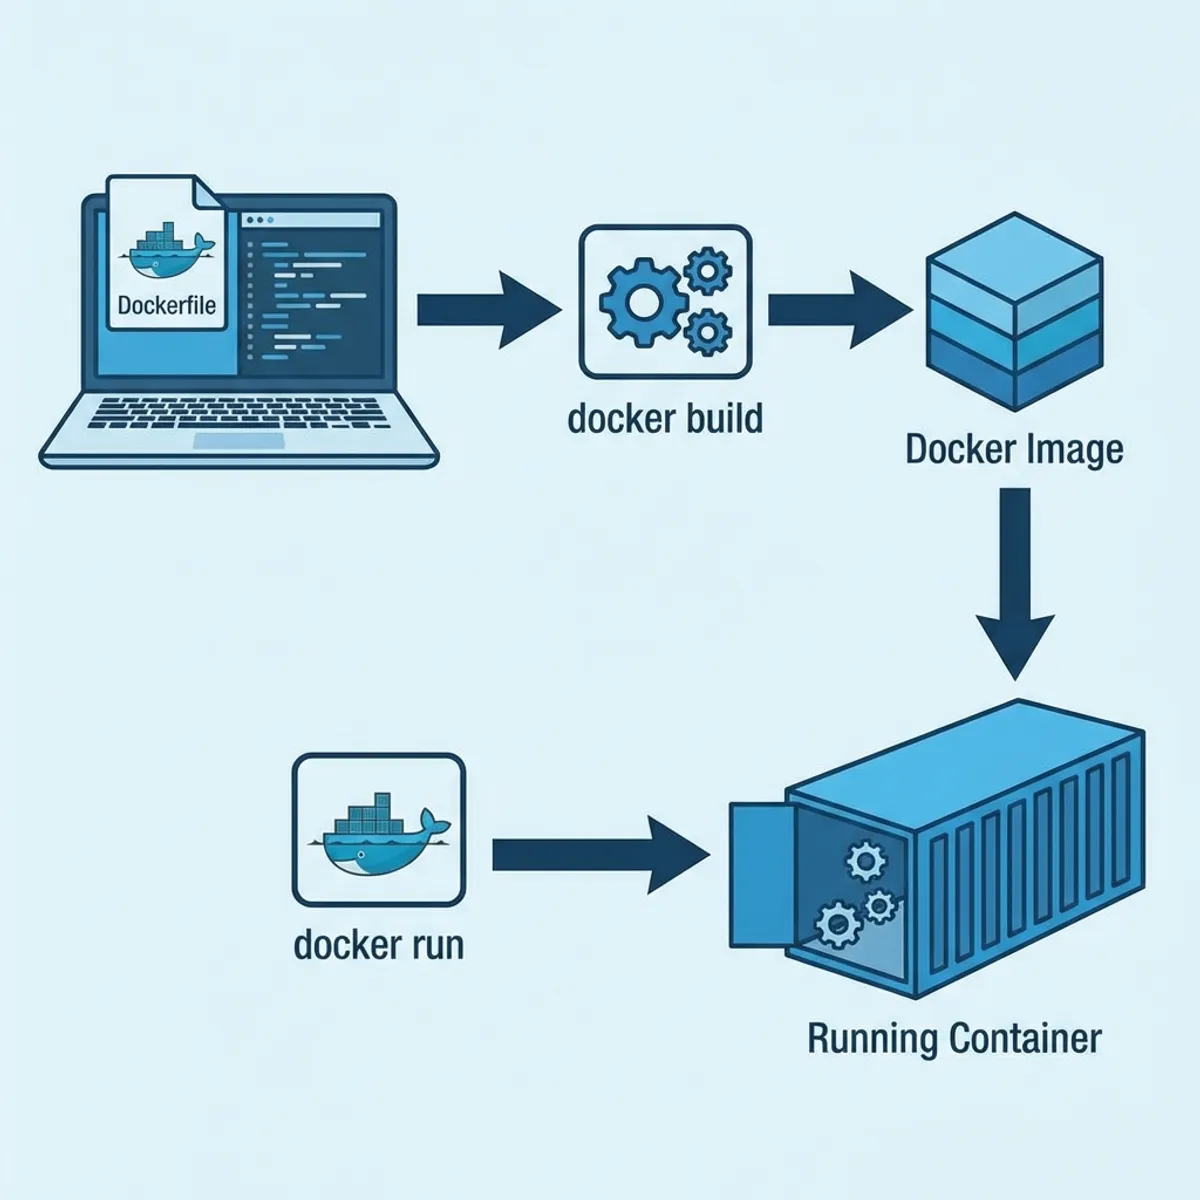
Docker images are built from layers. Each Dockerfile instruction creates a new layer, which enables caching and faster rebuilds.
Key components:
- Docker Engine:
dockerddaemon that manages images, networks, volumes. - Container runtime: executes containers (OCI runtime like
runc). - Registry: stores images (
Docker Hub, private registry).
Installing Docker
Docker runs everywhere. Linux, Mac, Windows.
- Linux (Ubuntu):
curl -fsSL https://get.docker.com -o get-docker.sh sudo sh get-docker.sh - Windows/Mac: Download Docker Desktop from the official website. It’s a simple install wizard.
Verify installation:
docker --versionYour first container
Let’s try running an Nginx web server. No need to install Nginx on your actual laptop, just summon it with Docker.
docker run -d -p 8080:80 nginxDeciphering the spell:
docker run: The command to start a container.-d(detached): Run in the background (don’t lock up my terminal).-p 8080:80: Port mapping. Port 8080 on your laptop connects to port 80 inside the container.nginx: The name of the image to use.
Now open your browser and go to http://localhost:8080.
Boom! Welcome to nginx!. You just ran a web server without polluting your operating system.
Critical concepts: image vs container
Beginners often get these mixed up.
- Image: This is the “blueprint” or raw file. It is Read Only. (Think Windows Installer .iso)
- Container: This is the actual running instance created from the Image. It is Read Write (ephemeral). (Think A laptop with Windows installed).
Commands you must memorize:
- Download an image:
docker pull ubuntu - List images you have:
docker images - List running containers:
docker ps - Stop a container:
docker stop <CONTAINER_ID>

Layers and cache: why dockerfile order matters
Dockerfile is not just a recipe list. Order affects speed and rebuild time.
Efficient pattern:
- copy
package.jsonfirst - install dependencies
- then copy application code
That way, when only code changes, Docker reuses cached dependency layers.
Helpful commands:
docker build --no-cache .: rebuild without cache.docker history <image>: inspect layer sizes.
Building a custom image (dockerfile)
Using someone else’s image (Nginx) is easy. But how do you package your own app? You use a file called Dockerfile.
Suppose you have a simple Node.js app (app.js). Create a file named Dockerfile (no extension) in the same folder:
# 1. Start from a base image (OS + Node.js)
FROM node:18-alpine

# 2. Set working directory inside container
WORKDIR /app

# 3. Copy your package.json first
COPY package.json .

# 4. Install dependencies
RUN npm install

# 5. Copy the rest of your app code
COPY . .

# 6. Tell Docker which port this app uses
EXPOSE 3000

# 7. Command to run when container starts
CMD ["node", "app.js"]
Now let’s “cook” this recipe into an Image:
docker build -t my-app:v1 .-t: Tag/Name the image (my-app version 1)..: Location of the Dockerfile (dot means current directory).
Run your new creation:
docker run -p 3000:3000 my-app:v1Data persistence (Docker volumes)
By default, if you delete a container, all data inside it is gone forever. Imagine running a MySQL database in a container. You fill it with data all day. Then you delete the container. When you run it again, the database is empty. Nightmare fuel.
The solution: Volumes. A Volume is like a USB drive plugged into the container. Even if the container is destroyed, the data in the volume stays safe on your laptop.
Using a volume:
docker run -v mysql_data:/var/lib/mysql mysqlNow MySQL data will be stored in a volume named mysql_data managed by Docker. Safe and sound.
Bind mount vs volume: which one to use?
Two ways to persist data:
- Volume: managed by Docker, stable, production-friendly.
- Bind mount: map a host folder into a container, great for development.
Example bind mount:
docker run -v $(pwd):/app node:18-alpineRule of thumb:
- Development: bind mount.
- Production: volume or external storage.
Networking: ports, bridges, and debugging connectivity
By default, containers are attached to a bridge network with internal IPs.
Useful commands:
docker network ls: list networks.docker network inspect <name>: see which containers are attached.docker port <container>: check port mappings.
Network modes:
bridge: default and safe.host: container uses host network (fast, less isolation).none: no networking at all.
Docker compose: orchestrating containers
Modern apps rarely stand alone. You usually have a Web App + Database + Redis.
Running them one by one with docker run is tedious and hard to memorize.
Meet Docker Compose. We can define all containers in a single docker-compose.yml file.
Example docker-compose.yml for WordPress + MySQL:
version: "3.8"

services:
  db:
    image: mysql:5.7
    volumes:
      - db_data:/var/lib/mysql
    environment:
      MYSQL_ROOT_PASSWORD: super_secret_password
      MYSQL_DATABASE: wordpress

  wordpress:
    image: wordpress:latest
    ports:
      - "8000:80"
    environment:
      WORDPRESS_DB_HOST: db:3306
      WORDPRESS_DB_USER: root
      WORDPRESS_DB_PASSWORD: super_secret_password
    depends_on:
      - db

volumes:
  db_data:
To run everything, you just need one command:
docker-compose up -dDocker will automatically download images, set up a network so WordPress can talk to MySQL, and start everything up. Simple, elegant.

Debugging containers: a must-have habit
Commands that save you in production:
docker logs <container>: view app logs.docker exec -it <container> sh: get a shell inside.docker inspect <container>: full config view.docker stats: realtime resource usage.
Check exit codes when a container dies:
docker ps -a --format "table {{.Names}}\t{{.Status}}\t{{.ExitCode}}"Common beginner mistakes
- Forgetting to Expose Ports: Container running but can’t access it? You probably forgot
-p 8080:80. Containers are isolated; you must “poke a hole” in the wall to let traffic in. - Mounting Code in Production: In dev, we often bind mount code (
-v ./code:/app) so we don’t have to rebuild on every edit. But for production, don’t do this. Copy the code into the image (COPY) so it’s immutable and consistent. - Layer Caching: Order matters in Dockerfile. Always copy
package.jsonand runnpm installBEFORE copying the app code (COPY . .). This way, if you only change code, Docker doesn’t need to reinstall npm packages from scratch (it uses cache). - Running as Root: Create a non-root user in your Dockerfile (
USER nodefor example). - No Resource Limits: In production, set
--memoryand--cpusso one container doesn’t starve the host.
Want to see how these mistakes can cause chaos in production? Check out my real-world Docker troubleshooting case study based on an actual incident.
What’s next?
Congratulations! You understand Docker basics. From here, the DevOps world opens up. Your next steps:
- Deploy Docker to a VPS (DigitalOcean/AWS).
- Learn CI/CD (automate building images when you push to GitHub).
- If you have hundreds of containers, look into Kubernetes (but save that for later, don’t rush).
Remember, errors are your friends. If you get stuck, docker logs <container_id> is your best buddy. Happy containerizing!
I hope this guide on Docker basics helps you make better decisions in real-world situations.
Implementation Checklist
- Replicate the steps in a controlled lab before production changes.
- Document configs, versions, and rollback steps.
- Set monitoring + alerts for the components you changed.
- Review access permissions and least-privilege policies.
Official References
Need a Hand?
If you want this implemented safely in production, I can help with assessment, execution, and hardening.
Contact MeAbout the Author
Kamandanu Wijaya
IT Infrastructure & Network Administrator
Infrastructure & network administrator with 14+ years of enterprise experience, focused on stability, security, and automation.
Certifications: Google IT Support, Cisco Networking Academy, DevOps.
View ProfileNeed IT Solutions?
DoWithSudo team is ready to help setup servers, VPS, and your security systems.
Contact Us